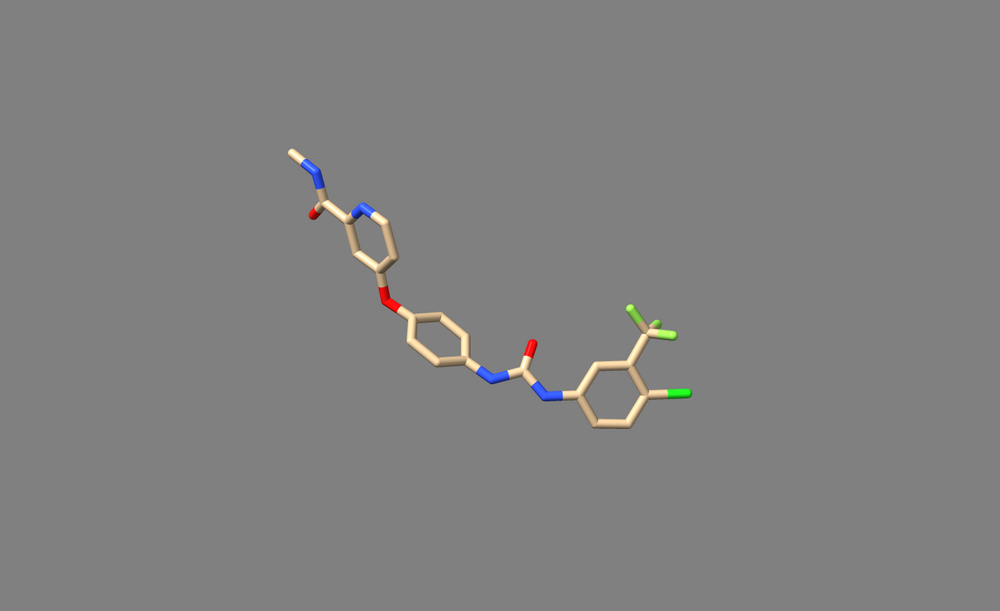
Difference between revisions of "2023 DOCK tutorial 2 with PDBID 3WZE"
Stonybrook (talk | contribs) (→Surface Generation) |
BrockBoysan (talk | contribs) (→Grid generation) |
||
| (37 intermediate revisions by one other user not shown) | |||
| Line 110: | Line 110: | ||
cp -r directory_1 directory_2 | cp -r directory_1 directory_2 | ||
| + | |||
| + | To move a directory from your local machine to Seawulf, from your local directory, type: | ||
| + | |||
| + | scp -r 'NETID@login.seawulf.stonybrook.edu:/FULL PATH' . | ||
| + | |||
| + | To move a file from your local machine to Seawulf, from your local directory, type: | ||
| + | |||
| + | scp FILENAME NETID@login.seawulf.stonybrook.edu:/FULL PATH | ||
== '''Directory Organization''' == | == '''Directory Organization''' == | ||
| Line 131: | Line 139: | ||
Open 3WZE in Chimera or ChimeraX to examine it. It should contain the structures of VEGFR II (henceforth called the "receptor"), the bound inhibitor sorafinib (a ligand), and a number of crystallographic waters. | Open 3WZE in Chimera or ChimeraX to examine it. It should contain the structures of VEGFR II (henceforth called the "receptor"), the bound inhibitor sorafinib (a ligand), and a number of crystallographic waters. | ||
| + | |||
| + | == Streamlined Prep == | ||
| + | |||
| + | While following each of the sections below can be informative, I've also included this streamlined prep section to save you from having to do some extra steps. This abbreviated protocol works for 3WZE, but it may not work correctly for your protein, so be sure to check things like charges, hydrogens, presence of non-standard residues, and missing loops before applying this process to your protein. | ||
| + | |||
| + | '''ChimeraX''': | ||
| + | |||
| + | 1. Download 3WZE.pdb from the Protein Data Bank, and open it in ChimeraX | ||
| + | |||
| + | 2. Follow the steps in the Filling in Missing Loops section. You can skip this if your protein doesn't have any missing loops. | ||
| + | |||
| + | 3. Type "delete ligand" | ||
| + | |||
| + | 4. Type "dockprep" | ||
| + | |||
| + | 5. Save the receptor as a .mol2 file. | ||
== Removing Solvent == | == Removing Solvent == | ||
| Line 147: | Line 171: | ||
'''ChimeraX''': | '''ChimeraX''': | ||
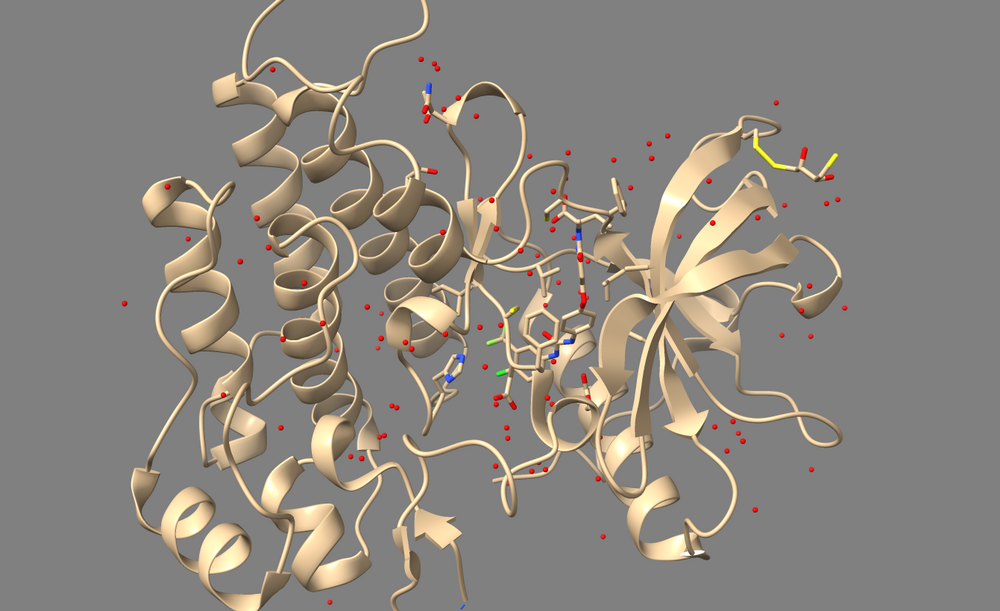
| − | 1. Type "delete solvent" into the command line. | + | 1. Type "show solvent" into the command line. This isn't necessary, but it allows you to see whether step 2 worked. The waters should appear as little red balls: |
| + | |||
| + | [[File: DougVSwater.png|thumb|center|1000px]] | ||
| + | |||
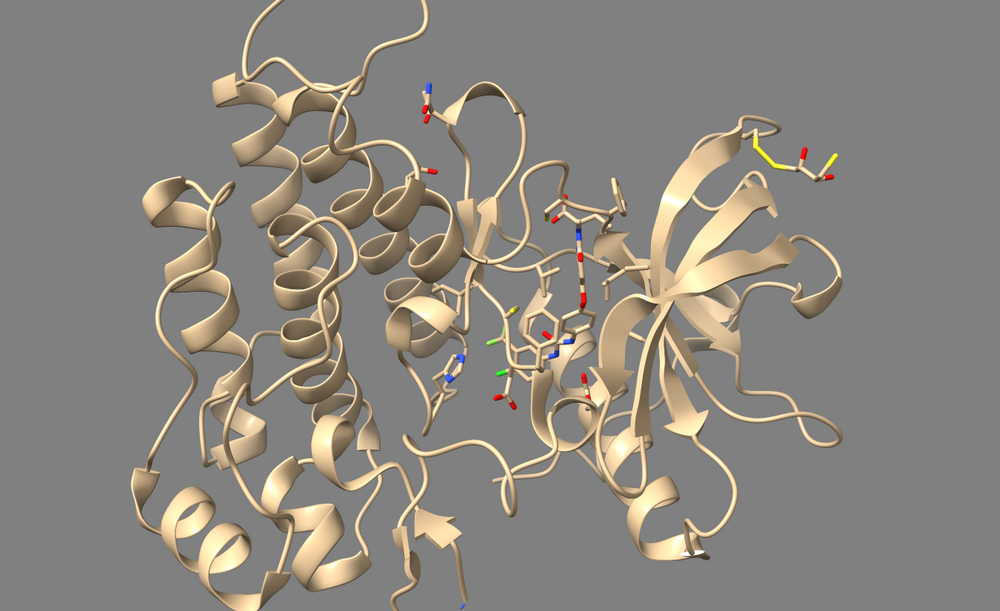
| + | 2. Type "delete solvent" into the command line. | ||
| + | |||
| + | [[File: DougVSnowater.png|thumb|center|1000px]] | ||
== Removing the Ligand and Non-Standard Residues == | == Removing the Ligand and Non-Standard Residues == | ||
To perform a virtual screen, the binding site of the receptor must be empty of any bound ligand. 3ZWE has the inhibitor sorafinib bound within the active site. Both Chimera and ChimeraX designate it as a ligand, and as a non-standard residue. If you look at the list of non-standard residues, you'll notice that 3WZE also contains a free-floating acetone molecule and a cysteine residue which has formed a disulfide bond with the reducing agent dithiothreitol. Neither the acetone molecule, nor the DTT-cysteine are reflective of the receptor's state in nature, and are instead artifacts of the crystallization process used to solve the receptor's structure. Therefore, they should be removed alongside the sorafinib ligand. | To perform a virtual screen, the binding site of the receptor must be empty of any bound ligand. 3ZWE has the inhibitor sorafinib bound within the active site. Both Chimera and ChimeraX designate it as a ligand, and as a non-standard residue. If you look at the list of non-standard residues, you'll notice that 3WZE also contains a free-floating acetone molecule and a cysteine residue which has formed a disulfide bond with the reducing agent dithiothreitol. Neither the acetone molecule, nor the DTT-cysteine are reflective of the receptor's state in nature, and are instead artifacts of the crystallization process used to solve the receptor's structure. Therefore, they should be removed alongside the sorafinib ligand. | ||
| + | |||
| + | [[File: DougVScysdtt.png|thumb|center|1000px]] | ||
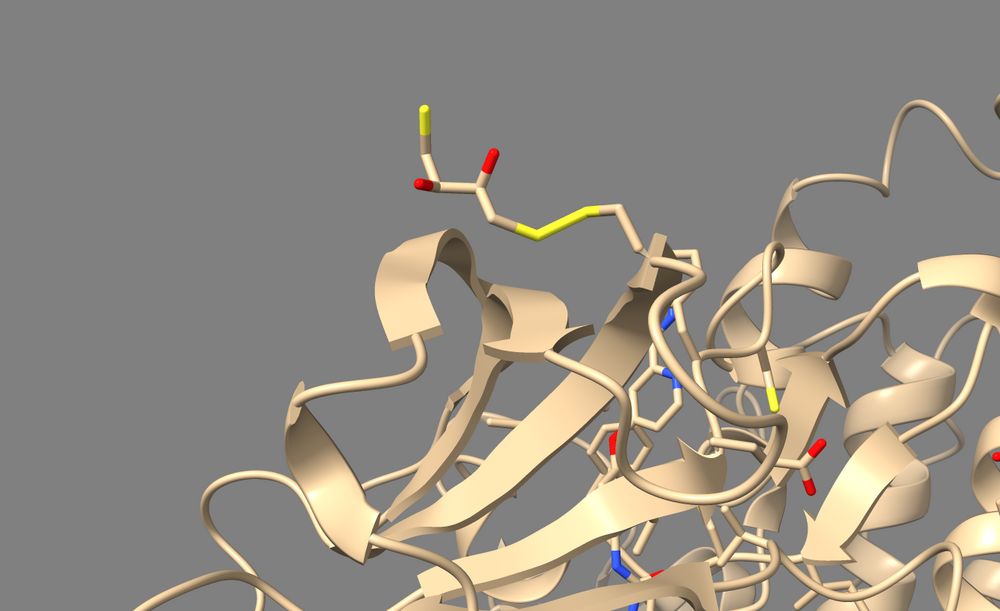
| + | Here's a view of 682 which displays the abnormal disulfide bond with DTT. | ||
| + | |||
| + | [[File: DougVSacetone.png|thumb|center|1000px]] | ||
| + | And this is the acetone molecule that we should get rid of. | ||
'''Chimera''': | '''Chimera''': | ||
| Line 163: | Line 199: | ||
1. Type "delete ligand" (the acetone, sorafinib, and cysteine-DTT are all designated as ligands, so this one command will delete them all) | 1. Type "delete ligand" (the acetone, sorafinib, and cysteine-DTT are all designated as ligands, so this one command will delete them all) | ||
| − | Check that the cysteine sidechain is intact after the deletion of its bonded DTT. In the case of 3WZE, the cysteine sidechain remains intact after running the above commands in either program. | + | Check that the cysteine sidechain is intact after the deletion of its bonded DTT. In the case of 3WZE, the cysteine sidechain remains intact after running the above commands in either program: |
| + | |||
| + | [[File: DougVScysnoDTT.png|thumb|center|1000px]] | ||
== Filling in Missing Loops == | == Filling in Missing Loops == | ||
| Line 234: | Line 272: | ||
'''ChimeraX''': | '''ChimeraX''': | ||
| − | 1. Type “addh” into the command line. | + | 1. Type “addh” into the command line. |
| + | |||
| + | 2. Type "show sidechain" into the command line. The molecule should now look liike the image below, where the white atoms are hydrogens: | ||
| + | |||
| + | [[File: DougVShyd.png|thumb|center|1000px]] | ||
This will populate the entire protein with hydrogens, but it will also make the N and C termini charged when we add charges, which isn’t reflective of the charge state of those residues in nature. The receptor in 3WZE is only a portion of the VEGFR II protein, so the backbone ends in 3WZE aren't the protein's true N and C termini. Chimera and ChimeraX has no way of knowing this however, so it will add one too many hydrogens at the N terminal side of the receptor and one too few at the C terminal side of the receptor. This incorrect hydrogenation may not be reflective of the protein in nature, but it is reflective of the protein construct as it was crystallized, so it doesn’t need to be corrected as long as the charged termini aren’t close enough to the active site to mess with docking. In the case of 3WZE, they are not too close, so we can leave the construct's ends as they are. | This will populate the entire protein with hydrogens, but it will also make the N and C termini charged when we add charges, which isn’t reflective of the charge state of those residues in nature. The receptor in 3WZE is only a portion of the VEGFR II protein, so the backbone ends in 3WZE aren't the protein's true N and C termini. Chimera and ChimeraX has no way of knowing this however, so it will add one too many hydrogens at the N terminal side of the receptor and one too few at the C terminal side of the receptor. This incorrect hydrogenation may not be reflective of the protein in nature, but it is reflective of the protein construct as it was crystallized, so it doesn’t need to be corrected as long as the charged termini aren’t close enough to the active site to mess with docking. In the case of 3WZE, they are not too close, so we can leave the construct's ends as they are. | ||
| Line 245: | Line 287: | ||
1. Use Tools->Structure Editing->Add Charge | 1. Use Tools->Structure Editing->Add Charge | ||
| + | |||
| + | Standard residues: AMBER ff14SB | ||
| + | Other residues: AM1-BCC | ||
2. Click OK in the pop-up window | 2. Click OK in the pop-up window | ||
| Line 251: | Line 296: | ||
1. Type "addcharge" | 1. Type "addcharge" | ||
| + | 2. Save the molecule as a mol2 file | ||
| + | 3. Open the mol2 file in a text editor in order to check that charges were added. Atomic charges will appear in the last column of the mol2 file, as highlighted below: | ||
| + | |||
| + | [[File: Mthd.PNG|thumb|center|1000px]] | ||
= '''Preparing the Ligand''' = | = '''Preparing the Ligand''' = | ||
| + | |||
| + | '''Chimera''': | ||
| + | |||
| + | 1. Use Select->Residue->BAX to select the ligand. | ||
| + | |||
| + | 2. Use Select->Invert (all models) | ||
| + | |||
| + | 3. Use Actions->Atoms/Bonds->Delete | ||
| + | |||
| + | 4. Use Tools->Structure Editing->AddH | ||
| + | |||
| + | 5. Return to the paper, and check whether the hydrogens added by ChimeraX is accurate to the actual chemistry. Be considerate of any diagrams depicting hbonds or charge-charge interactions when looking for clues. Also be mindful of pH of the solution used to generate crystals. In the case of 3WZE, the hydrogens added by Addh are correct. | ||
| + | |||
| + | 6. Save the ligand as a mol2 file. | ||
| + | |||
| + | 7. Open it in a text viewer such as Text Editor, or open it from the command line with commands like "vi" or "nano" | ||
| + | |||
| + | 8. Check that the bonds are correct. For this particular ligand, bonds 7 and 8 were erroneously labeled as double bonds when they should be amide bonds, and the corresponding Nitrogen atoms (N12 and N14, or atoms 26 and 27 in the mol2 file) are labeled as “N.pl3” instead of “N.am”. | ||
| + | |||
| + | 9. Change the “2” in the last column of bond 7’s and bond 8’s rows to “am”. This will change the double bond to an amide bond. | ||
| + | Change the “N.pl3” to “N.am” in the rows for atoms 26 and 27. This will make Nitrogen 12 and 14 into amide nitrogens as they should be. | ||
| + | |||
| + | 11. Save the new mol2 file | ||
| + | |||
| + | 12. Open the mol2 in Chimera | ||
| + | |||
| + | 13. Use Tools->Structure Editing->Add Charge to add charges | ||
| + | |||
| + | Standard residues: AMBER ff14SB | ||
| + | Other residues: AM1-BCC | ||
| + | |||
| + | 14. Click OK in the pop-up window. For 3WZE, an additional pop-up will appear asking you to set the overall charge of the molecule because it isn't a standard molecule that Chimera would know the charge of. Set the charge based on your knowledge of chemistry and the information in the paper. For 3WZE, set it to 0. | ||
| + | |||
| + | 15. Save the molecule as a final mol2 file. | ||
| + | |||
| + | |||
| + | '''ChimeraX''': | ||
| + | |||
| + | 1. Open the original 3WZE.pdb file in ChimeraX | ||
| + | |||
| + | 2. Select the Sorafinib inhibitor by typing "select :BAX". A green outline should appear around the ligand. The non-standard residue name assigned to sorafinib is "BAX" for some reason. | ||
| + | |||
| + | [[File: DougVSlig1.png|thumb|center|1000px]] | ||
| + | |||
| + | 3. Use Select->Invert to select everything except the ligand. Everything except the ligand should now have a green outline. | ||
| + | |||
| + | [[File: DougVSlig2.png|thumb|center|1000px]] | ||
| + | |||
| + | 4. Type "delete sel". You should just be left with your ligand: | ||
| + | |||
| + | [[File: DougVSlig3.png|thumb|center|1000px]] | ||
| + | |||
| + | 5. Type "addh" | ||
| + | |||
| + | [[File: DougVSlig4.png|thumb|center|1000px]] | ||
| + | |||
| + | 6. Return to the paper, and check whether the hydrogens added by ChimeraX is accurate to the actual chemistry. Be considerate of any diagrams depicting hbonds or charge-charge interactions when looking for clues. Also be mindful of pH of the solution used to generate crystals. In the case of 3WZE, the hydrogens added by Addh are correct. | ||
| + | |||
| + | 7. Save the ligand as a mol2 file. | ||
| + | |||
| + | 8. Open it in a text viewer such as Text Editor, or open it from the command line with commands like "vi" or "nano" | ||
| + | |||
| + | 9. Check that the bonds are correct. For this particular ligand, bonds 7 and 8 were erroneously labeled as double bonds when they should be amide bonds, and the corresponding Nitrogen atoms (N12 and N14, or atoms 26 and 27 in the mol2 file) are labeled as “N.pl3” instead of “N.am”. | ||
| + | |||
| + | 10. Change the “2” in the last column of bond 7’s and bond 8’s rows (shown below) to “am”. This will change the double bond to an amide bond. | ||
| + | |||
| + | [[File: DougVSlig5.PNG|thumb|center|1000px]] | ||
| + | |||
| + | Change the “N.pl3” to “N.am” in the rows for atoms 26 and 27. This will make Nitrogen 12 and 14 into amide nitrogens as they should be. | ||
| + | |||
| + | [[File: DougVSlig6.PNG|thumb|center|1000px]] | ||
| + | |||
| + | 11. Save the new mol2 file | ||
| + | |||
| + | 12. Open the mol2 in ChimeraX | ||
| + | |||
| + | 13. With most ligands, you should be able to simply type “addcharge” to assign charges to each atom and save as a mol2 file. However, doing that with this molecule will erroneously assign a +1 charge somewhere and yield an error message. To avoid that, force ChimeraX to assign a neutral charge by typing “addcharge nonstd :BAX BAX 0” | ||
| + | |||
| + | 14. Save the molecule as a final mol2 file. | ||
= ''' Surface & Spheres '''= | = ''' Surface & Spheres '''= | ||
| + | |||
| + | At this stage, move directories to Seawulf. | ||
| + | |||
==='''Surface Generation'''=== | ==='''Surface Generation'''=== | ||
| − | The generation of the surface of the receptor protein will have better visualization of the binding site of the receptor. In order to do so, load the mol2 file of 3WZE receptor in Chimera: | + | The generation of the surface of the receptor protein will have better visualization of the binding site of the receptor. In order to do so, load the mol2 file of 3WZE receptor without hydrogens in Chimera: |
Action < Surface < show | Action < Surface < show | ||
| + | Then you will be able to visualize the surface of your protein in Chimera, it will be like something in the image below: | ||
| + | [[File:3WZEsurface.png|center|600px]] | ||
Then we will save the dms(molecular surface) file as 3WZE_rec.dms, which will be used in the next step of spheres generation: | Then we will save the dms(molecular surface) file as 3WZE_rec.dms, which will be used in the next step of spheres generation: | ||
| Line 274: | Line 407: | ||
First create a new file “INSPH” by typing the following into terminal: | First create a new file “INSPH” by typing the following into terminal: | ||
vi INSPH | vi INSPH | ||
| − | + | Note that the name "INSPH" is not arbitrary. Attempting to use a differently named input file will yield an error message. | |
| + | |||
| + | Type the following information into this file (anything after # are comments that are references for reading only, and should not be putting into the file) : | ||
3WZE_rec.dms #Molecular Surface file | 3WZE_rec.dms #Molecular Surface file | ||
R #This line specifies whether to make the spheres in the model’s exterior (R) or interior (L) | R #This line specifies whether to make the spheres in the model’s exterior (R) or interior (L) | ||
| Line 282: | Line 417: | ||
1.4 #Minimum radius of each sphere | 1.4 #Minimum radius of each sphere | ||
3WZE.sph #Name of the output file that will be made | 3WZE.sph #Name of the output file that will be made | ||
| − | Then save the file and run the following command on terminal: note that if you want to re-run this command, make sure you remove file “OUTSPH” before your re-run because this file cannot be overwritten. | + | Then save the file and run the following command on terminal: note that if you want to re-run this command, make sure you remove file “OUTSPH” before your re-run because this file cannot be overwritten. Also remove any temp files that sphgen made. Also bear in mind that sphgen will crash if your protein is too big (greater than ~900 amino acids), so if you're getting an error message, try deleting part of your protein which isn't needed for docking before generating the surface and trying to generate spheres. |
sphgen -i INSPH -o OUTSPH | sphgen -i INSPH -o OUTSPH | ||
The output file “3WZE.sph” can be visualized by using Chimera, load the output file along with the receptor protein mol2 file, the two structures should be overlapping: | The output file “3WZE.sph” can be visualized by using Chimera, load the output file along with the receptor protein mol2 file, the two structures should be overlapping: | ||
| + | [[File:3WZEsphere.png|center|600px]] | ||
==='''Spheres selection'''=== | ==='''Spheres selection'''=== | ||
| Line 290: | Line 426: | ||
sphere_selector 3WZE.sph 3WZE_lig.mol2 10.0 | sphere_selector 3WZE.sph 3WZE_lig.mol2 10.0 | ||
#sphere_selector [sphere output file] [ligand mol2 file] [radius for distance from ligand] | #sphere_selector [sphere output file] [ligand mol2 file] [radius for distance from ligand] | ||
| + | Open this file in Chimera along with the receptor file, you will see something like this: | ||
| + | [[File:3WZEselectedsph.png|center|600px]] | ||
= '''Box and Grid '''= | = '''Box and Grid '''= | ||
| Line 299: | Line 437: | ||
vi showbox.in | vi showbox.in | ||
Then type the following information into the file (anything after # are comments that are references for reading only, and should not be putting into the file) : | Then type the following information into the file (anything after # are comments that are references for reading only, and should not be putting into the file) : | ||
| − | + | Y #Indicates that we want to make a box | |
| − | + | 8.0 #Extra length beyond the spheres to be included by the box in all directions | |
| − | + | ../002_surface_spheres/selected_spheres.sph #Indicates that the box should be constructed to encompass the spheres in this file. | |
| − | + | 1 #This specifies which cluster of spheres should be used to generate the box. | |
| − | + | 3WZE.box.pdb #Name of output file | |
| + | |||
Then, run the following code to get the boxed structure: | Then, run the following code to get the boxed structure: | ||
showbox < showbox.in | showbox < showbox.in | ||
| Line 311: | Line 450: | ||
vi grid.in | vi grid.in | ||
Then type the following information into the file: | Then type the following information into the file: | ||
| + | allow_non_integral_charges no | ||
compute_grids yes | compute_grids yes | ||
grid_spacing 0.4 | grid_spacing 0.4 | ||
| Line 322: | Line 462: | ||
distance_dielectric yes | distance_dielectric yes | ||
dielectric_factor 4 | dielectric_factor 4 | ||
| + | allow_non_integral_charges yes | ||
bump_filter yes | bump_filter yes | ||
bump_overlap 0.75 | bump_overlap 0.75 | ||
| Line 331: | Line 472: | ||
grid -i grid.in -o gridinfo.out | grid -i grid.in -o gridinfo.out | ||
This will generate three files: “gridinfo.out”, “grid.bmp”, and “grid.nrg”. Open “gridinfo.out” and check if the information about the receptor matches the that from the paper and your previous preparations. Also check to make sure there are no error messages at the bottom. | This will generate three files: “gridinfo.out”, “grid.bmp”, and “grid.nrg”. Open “gridinfo.out” and check if the information about the receptor matches the that from the paper and your previous preparations. Also check to make sure there are no error messages at the bottom. | ||
| + | |||
| + | Open "grid.nrg" and receptor file in Chimera, we will be able to see the energy grid of the protein: | ||
| + | [[File:3WZEgridenergy.png|center|600px]] | ||
| + | |||
| + | Open "grid.bmp" and receptor file in Chimera, we will be able to see the bump grid of the protein: | ||
| + | [[File:3WZEgridbump.png|center|600px]] | ||
='''Energy minimization '''= | ='''Energy minimization '''= | ||
Change the current working directory in terminal to do preparation for DOCK: | Change the current working directory in terminal to do preparation for DOCK: | ||
cd 004_dock | cd 004_dock | ||
| + | You may want to move over grid.nrg and grid.bmp as well. | ||
| + | |||
To improve the accuracy of DOCK calculation of ligand protein binding, we will have to minimize the potential energy of the ligand. To do so, create a new file “min.in” by using the following command: | To improve the accuracy of DOCK calculation of ligand protein binding, we will have to minimize the potential energy of the ligand. To do so, create a new file “min.in” by using the following command: | ||
vi min.in | vi min.in | ||
| Line 342: | Line 491: | ||
internal_energy_rep_exp 12 | internal_energy_rep_exp 12 | ||
internal_energy_cutoff 100.0 | internal_energy_cutoff 100.0 | ||
| − | ligand_atom_file ../000_files/ | + | ligand_atom_file ../000_files/3WZE_lig_wH.mol2 |
limit_max_ligands no | limit_max_ligands no | ||
skip_molecule no | skip_molecule no | ||
| Line 348: | Line 497: | ||
calculate_rmsd yes | calculate_rmsd yes | ||
use_rmsd_reference_mol yes | use_rmsd_reference_mol yes | ||
| − | rmsd_reference_filename ../000_files/ | + | rmsd_reference_filename ../000_files/3WZE_lig_wH.mol2 |
use_database_filter no | use_database_filter no | ||
orient_ligand no | orient_ligand no | ||
| Line 392: | Line 541: | ||
rank_ligands no | rank_ligands no | ||
Then run the following command through the use of DOCK: | Then run the following command through the use of DOCK: | ||
| − | dock6 -i min.in | + | dock6 -i min.in -o min.out |
| − | The output file “3WZE.lig.min_scored.mol2” is the potential energy minimized version of the ligand. | + | The output file “3WZE.lig.min_scored.mol2”(tan) is the potential energy minimized version of the ligand. Load this file along with ligand mol2 file(blue) in Chimera, you can compare the two molecules: |
| + | [[File:3WZEenergymin.png|center|600px]] | ||
= '''Reproducing the PDB's binding with DOCK''' = | = '''Reproducing the PDB's binding with DOCK''' = | ||
| Line 634: | Line 784: | ||
Copy the following into your file: | Copy the following into your file: | ||
| − | conformer_search_type | + | conformer_search_type rigid |
use_internal_energy no | use_internal_energy no | ||
ligand_atom_file 3WZE.lig.min_scored.mol2 | ligand_atom_file 3WZE.lig.min_scored.mol2 | ||
Latest revision as of 16:19, 12 February 2024
In this tutorial, you will learn how use the program DOCK6.10 to perform a virtual screen, in which you assess how well the molecules in a library of drug-like molecules bind to a protein of known structure.
Contents
Introduction
A protein whose function is found to be involved in one or more diseases may become a target for pharmaceutical design. Oftentimes, these pharmaceuticals are designed to compete with the enzyme's native substrate for the enzyme's active site, making many pharmaceutical molecules competitive inhibitors of their protein targets. If the target protein's structure is known, and the active site can be identified, then performing a virtual screen can be a monetarily and temporally efficient method of identifying molecules which are likely to bind well to the target's active site.
A virtual screen is set up by first preparing the enzyme's structure and the structure of its native substrate for docking, then the residues important for the native ligand to bind are identified by generating a footprint. A large library of drug-like molecules is then downloaded from a database such as ZINC (https://zinc.docking.org/), and, using the footprint and enzyme structure, docked into the enzyme using a program such as DOCK6.10. Results are then assessed to see which drug-like compounds match the native substrate's footprint profile and which are energetically comfortable within the simulated active site. Such molecules could then be tested biochemically for their ability to inhibit the target protein, sparing biochemists the hassle of having to test hundreds of thousands of compounds in physical screening experiments.
Software and Files
PDB 3WZE
PDB stands for "Protein Data Bank", which is a repository for the experimentally solved structures of proteins. Each protein structure is assigned a 4 digit code, and 3WZE is the code assigned to the solved structure of vascular endothelial growth factor receptor 2 (VEGFR2) bound to the inhibitor sorafenib. VEGFR2 is a receptor tyrosine kinase, meaning that it is an integral membrane protein that has an exofacial receptor domain, transmembrane domain, and cytofacial kinase domain. Because of the difficulties of protein purification, crystallization, and structure solution, many protein structures in the protein data bank are incomplete: lacking regions that are intrinsically disordered or otherwise not conducive to crystallization. PDB 3WZE is one such structure, because it only contains structural data for the cytofacial kinase domain of VEGFR2.
The active site of kinases is well characterized, and sorafenib is shown bound within it in PDB 3WZE, which will be useful for conducting later steps in the virtual screen.
Download the .pdb file of 3WZE, and use a program such as Chimera or ChimeraX to open and view it.
The Protein Data Bank home page can be found here:
DOCK6.10
DOCK is a program used to model conformations of molecules, and is typically used to find low potential energy conformations of drug-like molecules within the active sites of protein structures. Because molecules in nature tend to adopt conformations of the lowest possible potential energy, identifying low-energy conformations of molecules within proteins can be a useful way of identifying how such molecules may bind in nature. Thus, instead of having to manually test out libraries of thousands of molecules to identify potential therapeutics, a library of drug-like molecules can be docked into a protein of interest, vastly expediting the medicine development process at one of its earliest steps.
DOCK can be used for more purposes than drug identification though, and is capable of rigid and flexible docking, de novo design, and genetic algorithms. Rigid docking is when DOCK identifies low-potential energy conformations of a ligand within the target protein, but while keeping the ligand rigid. Flexible docking on the other hand allows for rotations around the ligand's internal rotatable bonds. De novo design is when DOCK attempts to build a new ligand outwards from a starting anchor specified by the user. Finally, genetic algorithms generate new ligands similarly tpo de novo design, but it also utilizes the principles of Darwinian evolution and natural selection to select for effective ligands over the course of multiple generations of ligand development.
For the purposes of this tutorial, you will only be using the rigid and flexible docking capabilities of DOCK. For more information on the other uses of DOCK, check the other tutorials in this wiki or consult the DOCK 6.10 User Manual:
https://dock.compbio.ucsf.edu/DOCK_6/dock6_manual.htm#RigidandFlexibleLigandDocking
Chimera
Chimera is a visualization program that can display the 3-dimensional structures of molecules. Although Chimera is no longer actively developed, it remains a useful tool and an essential part of this tutorial. As you follow this tutorial, molecular visualization programs like Chimera and ChimeraX will be useful for preparing the system for the virtual screen and checking the results of each step. The home page of Chimera can be found here:
https://www.cgl.ucsf.edu/chimera/
ChimeraX (optional)
Chimera is now no longer actively developed, and has been succeeded by ChimeraX, which is developed by the same group. Although ChimeraX has lost some of the functionality of its predecessor, it has new capabilities to compensate, and it is easier to operate using typed commands, whereas Chimera requires clicking through menus. That being said, Chimera is still required for this tutorial because ChimeraX cannot open .sph files and it cannot save a surface as a .dms file.
Separate instructions for completing the tutorial with ChimeraX will be provided alongside the instructions for using Chimera in each section.
The home page for ChimeraX can be found here:
https://www.cgl.ucsf.edu/chimerax/
Alphafold (optional)
Alphafold is a protein structure prediction program from Google's Deepmind, and it was the first program to predict the structures of proteins in the annual CASP competition to within 90% accuracy in 2020 (https://predictioncenter.org/casp14/zscores_final.cgi). Using this program, one can generate a reasonably accurate prediction of a protein's structure using only its amino acid sequence. In the context of virtual screening, this means that a protein's structure no longer needs to be solved experimentally before one can embark on a virtual screen of the target. As long as the active site can be identified (which is often done by comparing the predicted structure to homologous proteins with solved structures), one can perform a virtual screen of a protein of unsolved structure.
Even without a university server, Alphafold can be used from within ChimeraX by going to Tools -> Structure Prediction -> Alphafold. This will bring up a menu in which you can paste an amino acid sequence for prediction, searching, or retrieval from the Alphafold database. All human proteins have already been predicted by Alphafold, and their structures can be easily retrieved using the protein's UniProt identifier and the Fetch button. Non-human proteins will have to be predicted from scratch by inputting their amino acid sequence and using the Predict button.
Because this tutorial will use PDB file 3WZE, which contains the solved structure of the Vascular Endothelial Growth Factor Receptor and a bound inhibitor called sorafenib, Alphafold will be unnecessary for this tutorial, but the broadened scope of what virtual screens are possible as a result of this program is worth noting nonetheless.
The Alphafold home page can be found here:
Using the Terminal
Seawulf uses the Linux language for various commands. Here are some of the basic commands that will make running the tutorial run smoothly.
The first command is cd, which is used to change into different directories. To go to a desired directory do:
cd /desired/directory
To move to a previous directory you were just in, type:
cd ../
The cd command can also be used to get into a folder, type:
cd /desired/folder
The next command is the ls command. This will list out all the files or folders in the directory you are currently in, type:
ls
To make a new directory, type:
mdkir name_of_directory
To remove a file, type:
rm file
To delete a directory and all its contents, type:
rm -r directory
To create a file in the terminal, type:
vi filename
This will open up a blank screen in which you can start typing. To edit the file, first type “i”. This will make the environment go to “INSERT” mode. You can now freely type. In order to save whatever you wrote in the file, click the escape button. This will remove you from “INSERT” mode. Next type:
:wq
This will save any changes you have made to your file
To move a file to a new location, type:
mv file /new/destination
To make a copy of a file, type:
cp file file_new_name
This command can also be used to copy directories as well, type:
cp -r directory_1 directory_2
To move a directory from your local machine to Seawulf, from your local directory, type:
scp -r 'NETID@login.seawulf.stonybrook.edu:/FULL PATH' .
To move a file from your local machine to Seawulf, from your local directory, type:
scp FILENAME NETID@login.seawulf.stonybrook.edu:/FULL PATH
Directory Organization
Having defined folders established before starting is a great way to maintain organization and clarity as you go.
 000_files
 001_structure
 002_surface_spheres
 003_gridbox
 004_dock
 005_virtual_screen
 006_virtual_screen_mpi
 007_cartesian_min
 008_rescore
Additionally, file names should be clear and logical. We recommend starting with the PDB code followed by the receptor or ligand and ending with what changes were made. For example, 3WZE_lig_AddH_addCharge.mol2 indicates that this file is the ligand for 3WZE and hydrogens and charge have been added. Also, bear in mind that one should use underscores instead of spaces when naming files and directories. Otherwise, spaces in file or directory names can confuse many linux commands and make them mistake the names for command arguments.
Preparing the Receptor
Put the PDB file of 3WZE in files folder on Seawulf. You'll be doing initial receptor preparation steps on your local machine, but it's good to have the original file saved somewhere as a reference.
Open 3WZE in Chimera or ChimeraX to examine it. It should contain the structures of VEGFR II (henceforth called the "receptor"), the bound inhibitor sorafinib (a ligand), and a number of crystallographic waters.
Streamlined Prep
While following each of the sections below can be informative, I've also included this streamlined prep section to save you from having to do some extra steps. This abbreviated protocol works for 3WZE, but it may not work correctly for your protein, so be sure to check things like charges, hydrogens, presence of non-standard residues, and missing loops before applying this process to your protein.
ChimeraX:
1. Download 3WZE.pdb from the Protein Data Bank, and open it in ChimeraX
2. Follow the steps in the Filling in Missing Loops section. You can skip this if your protein doesn't have any missing loops.
3. Type "delete ligand"
4. Type "dockprep"
5. Save the receptor as a .mol2 file.
Removing Solvent
In Chimera, use Select->Residue->HOH to select water, then use Actions->Atoms/Bonds->Sphere to make the waters spheres, and finally use Actions->Atoms/Bonds->Show to reveal the waters. If you are using ChimeraX, simply type "show solvent" into the command line.
For the process of docking, these crystallographic waters within and around the receptor should be removed so that they don't impede the ability of ligands being docked to sample conformations on or within the receptor. However, if your receptor contains any water molecules which are essential for the structure or mechanism of it's active site, then those waters should be kept. Thus, one should read the paper associated with a PDB file to determine which waters, if any, should not be deleted.
In the case of 3WZE, there are no structurally important waters, so we'll delete all of them for the purposes of docking:
Chimera:
1. Use Select->Residue->HOH to select all water molecules.
2. Use Actions->Atoms/Bonds->delete to delete the selected molecules.
ChimeraX:
1. Type "show solvent" into the command line. This isn't necessary, but it allows you to see whether step 2 worked. The waters should appear as little red balls:
2. Type "delete solvent" into the command line.
Removing the Ligand and Non-Standard Residues
To perform a virtual screen, the binding site of the receptor must be empty of any bound ligand. 3ZWE has the inhibitor sorafinib bound within the active site. Both Chimera and ChimeraX designate it as a ligand, and as a non-standard residue. If you look at the list of non-standard residues, you'll notice that 3WZE also contains a free-floating acetone molecule and a cysteine residue which has formed a disulfide bond with the reducing agent dithiothreitol. Neither the acetone molecule, nor the DTT-cysteine are reflective of the receptor's state in nature, and are instead artifacts of the crystallization process used to solve the receptor's structure. Therefore, they should be removed alongside the sorafinib ligand.
Here's a view of 682 which displays the abnormal disulfide bond with DTT.
And this is the acetone molecule that we should get rid of.
Chimera:
1. Use Select->Residue->All non-standard (the acetone, sorafinib, and cysteine-DTT are all designated as non-standard residues)
2. Use Actions->Atoms/Bonds->Delete
ChimeraX:
1. Type "delete ligand" (the acetone, sorafinib, and cysteine-DTT are all designated as ligands, so this one command will delete them all)
Check that the cysteine sidechain is intact after the deletion of its bonded DTT. In the case of 3WZE, the cysteine sidechain remains intact after running the above commands in either program:
Filling in Missing Loops
While examining the receptor in 3WZE, you may have noticed that there are some gaps in the protein's backbone which are bridged by dashed lines. These are gaps in the protein's structure, and are an artifact of the crystallization processes that are necessary for solving a structure. X-ray crystallography, the process by which many of the solved protein structures on the PDB are determined, can only be used to solve the structure of a protein that is arranged in a repeating, identical pattern (a crystal), so if any portions of the protein are intrinsically disordered, they can be too flexible to be consistent within the crystal, and may prevent crystallization entirely. As a result, it is very common for such disordered loops to be truncated prior to the protein purification and crystallization process.
While removing these loops are necessary for obtaining a structure, they can present problems for docking, especially if they would present charged terminal ends which could affect the docking process. In the case of 3WZE, the missing loops are too far from the active site to present a threat to docking, but it's good practice to fill them in anyway.
Chimera:
1. Use Tools->Structure Editing->Model/Refine Loops
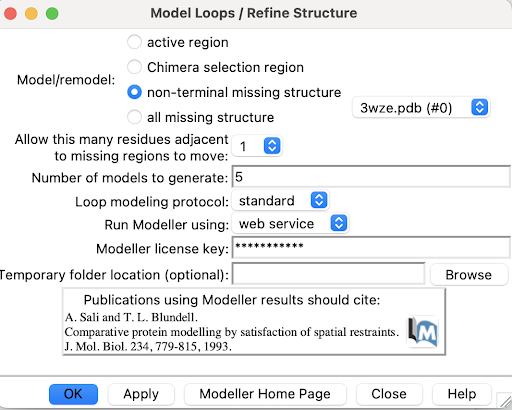
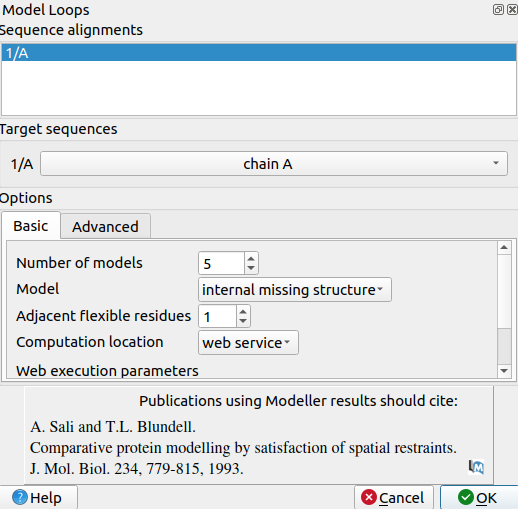
A pop-up window will appear:
2. Select non-terminal missing structure. The only missing loops are internal ones, so the other options aren't relevant.
3. For "Allow this many adjacent to missing regions to move", set it to 1 or 0. Allowing some flexibility can help modeled loops look more organic, so 1 may be better than 0, but going any more residues than 1 risks altering the receptor's structure too much.
4. For "Number of models to generate", set it to 5.
5. Input a modeller license key. You can get one for free at https://salilab.org/modeller/registration.html
6. Click OK. After a few minutes, a window will pop-up with the Z scores for each of the 5 new chains. See which chain has the lowest Z score.
7. Select the chain with the lowest Z score using Select->Chains->A->name of chain with lowest Z score
8. Use Select->Invert (selected models) to select all chains except for the one with the lowest Z score
9. Use Actions->Atoms/Bonds-> delete to delete the other chains. Only your chain with filled in loops and lowest Z score will be left.
ChimeraX
1. Use Tools->Sequence->Show Sequence Viewer to open the Sequence Viewer
2. Within the Sequence Viewer pop-up window, click on Chain A and click show. A sidebar with the amino acid sequence of the receptor should appear
3. Use Tools->Structure Prediction->Model Loops to open a pop-up window for modeling missing loops
4. Set number of models to 5
5. Set Model to Internal missing structure. The only missing loops are internal ones, so the other options aren't relevant.
6. Set adjacent flexible residues to 1 or 0. Allowing some flexibility can help modeled loops look more organic, so 1 may be better than 0, but going any more residues than 1 risks altering the receptor's structure too much.
7. Input a modeller license key. You can get one for free at https://salilab.org/modeller/registration.html
8. Click OK. After a few minutes, a window will pop-up with the Z scores for each of the 5 new chains. See which chain has the lowest Z score.
9. Select the chain with the lowest Z score by typing "select #chainnmbr". For instance, my lowest scored chain was called #3.1, so I would type "select #3.1"
10. Use Select->Invert to invert your selection
11. Type "delete sel" to delete the selected chains. This will only leave your chain with the lowest Z score and filled loops.
Although you may see some differences in secondary structure (such as where beta sheets begin and end) in areas outside of just the disordered loops, by comparing the placement of atoms, you can determine whether any actual changes were made to the placement of atoms. No atoms should have changed positions. Only the atoms within the missing loops should have been added.
Adding Hydrogens
hbonds in particular and hydrogens in general play an important role in docking calculations, however, due to the resolution limitations of X ray crystallography, hydrogens typically aren't included in a solved protein structure. They will need to be added artificially in Chimera or ChimeraX before docking.
Chimera:
1. Use Tools->Structure Editing->AddH 2. Click OK in the pop-up window
ChimeraX:
1. Type “addh” into the command line.
2. Type "show sidechain" into the command line. The molecule should now look liike the image below, where the white atoms are hydrogens:
This will populate the entire protein with hydrogens, but it will also make the N and C termini charged when we add charges, which isn’t reflective of the charge state of those residues in nature. The receptor in 3WZE is only a portion of the VEGFR II protein, so the backbone ends in 3WZE aren't the protein's true N and C termini. Chimera and ChimeraX has no way of knowing this however, so it will add one too many hydrogens at the N terminal side of the receptor and one too few at the C terminal side of the receptor. This incorrect hydrogenation may not be reflective of the protein in nature, but it is reflective of the protein construct as it was crystallized, so it doesn’t need to be corrected as long as the charged termini aren’t close enough to the active site to mess with docking. In the case of 3WZE, they are not too close, so we can leave the construct's ends as they are.
Adding Charges
Also important for the calculations that go into docking are atomic charges. Files from the PDB won't have assigned charges for each atom, but they'll need to be added for docking.
Chimera:
1. Use Tools->Structure Editing->Add Charge
 Standard residues: AMBER ff14SB
 Other residues: AM1-BCC
2. Click OK in the pop-up window
ChimeraX
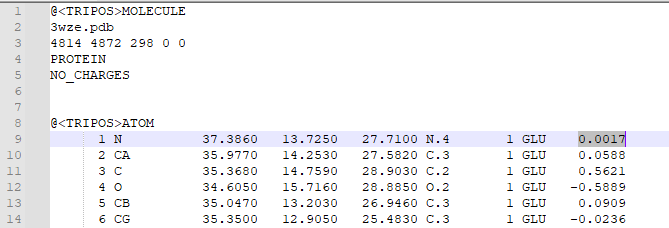
1. Type "addcharge" 2. Save the molecule as a mol2 file 3. Open the mol2 file in a text editor in order to check that charges were added. Atomic charges will appear in the last column of the mol2 file, as highlighted below:
Preparing the Ligand
Chimera:
1. Use Select->Residue->BAX to select the ligand.
2. Use Select->Invert (all models)
3. Use Actions->Atoms/Bonds->Delete
4. Use Tools->Structure Editing->AddH
5. Return to the paper, and check whether the hydrogens added by ChimeraX is accurate to the actual chemistry. Be considerate of any diagrams depicting hbonds or charge-charge interactions when looking for clues. Also be mindful of pH of the solution used to generate crystals. In the case of 3WZE, the hydrogens added by Addh are correct.
6. Save the ligand as a mol2 file.
7. Open it in a text viewer such as Text Editor, or open it from the command line with commands like "vi" or "nano"
8. Check that the bonds are correct. For this particular ligand, bonds 7 and 8 were erroneously labeled as double bonds when they should be amide bonds, and the corresponding Nitrogen atoms (N12 and N14, or atoms 26 and 27 in the mol2 file) are labeled as “N.pl3” instead of “N.am”.
9. Change the “2” in the last column of bond 7’s and bond 8’s rows to “am”. This will change the double bond to an amide bond. Change the “N.pl3” to “N.am” in the rows for atoms 26 and 27. This will make Nitrogen 12 and 14 into amide nitrogens as they should be.
11. Save the new mol2 file
12. Open the mol2 in Chimera
13. Use Tools->Structure Editing->Add Charge to add charges
Standard residues: AMBER ff14SB
Other residues: AM1-BCC
14. Click OK in the pop-up window. For 3WZE, an additional pop-up will appear asking you to set the overall charge of the molecule because it isn't a standard molecule that Chimera would know the charge of. Set the charge based on your knowledge of chemistry and the information in the paper. For 3WZE, set it to 0.
15. Save the molecule as a final mol2 file.
ChimeraX:
1. Open the original 3WZE.pdb file in ChimeraX
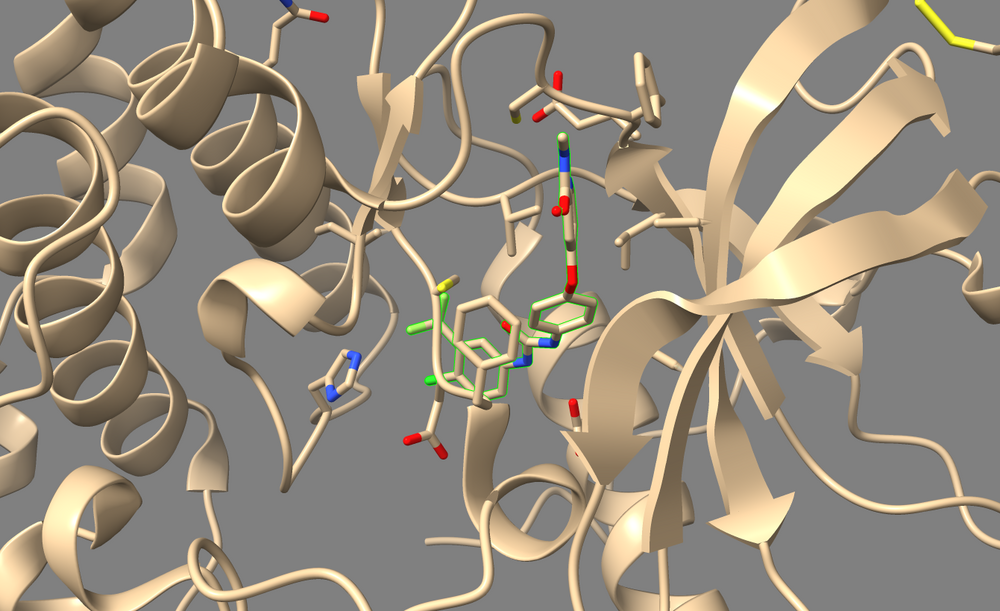
2. Select the Sorafinib inhibitor by typing "select :BAX". A green outline should appear around the ligand. The non-standard residue name assigned to sorafinib is "BAX" for some reason.
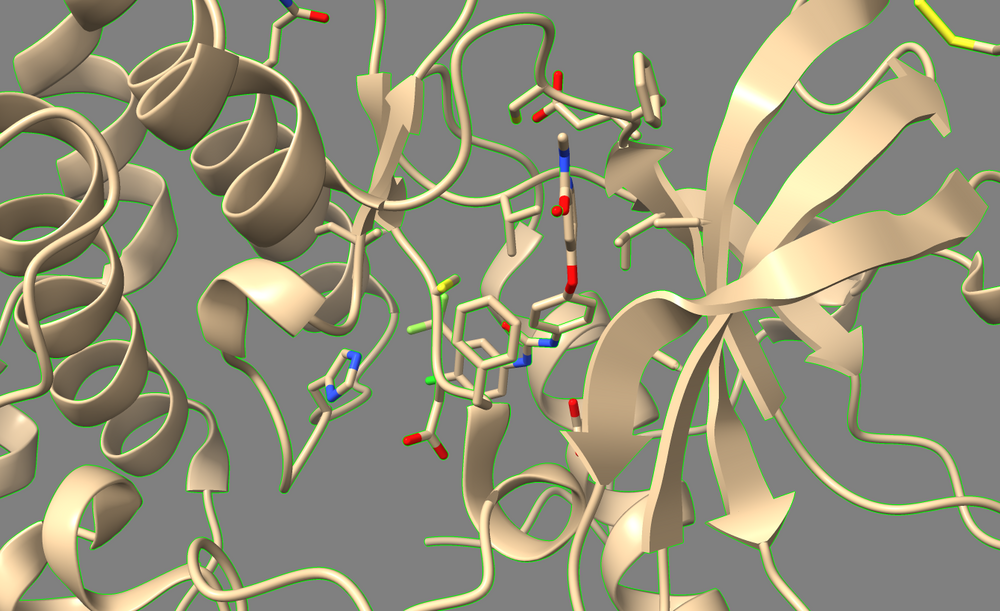
3. Use Select->Invert to select everything except the ligand. Everything except the ligand should now have a green outline.
4. Type "delete sel". You should just be left with your ligand:
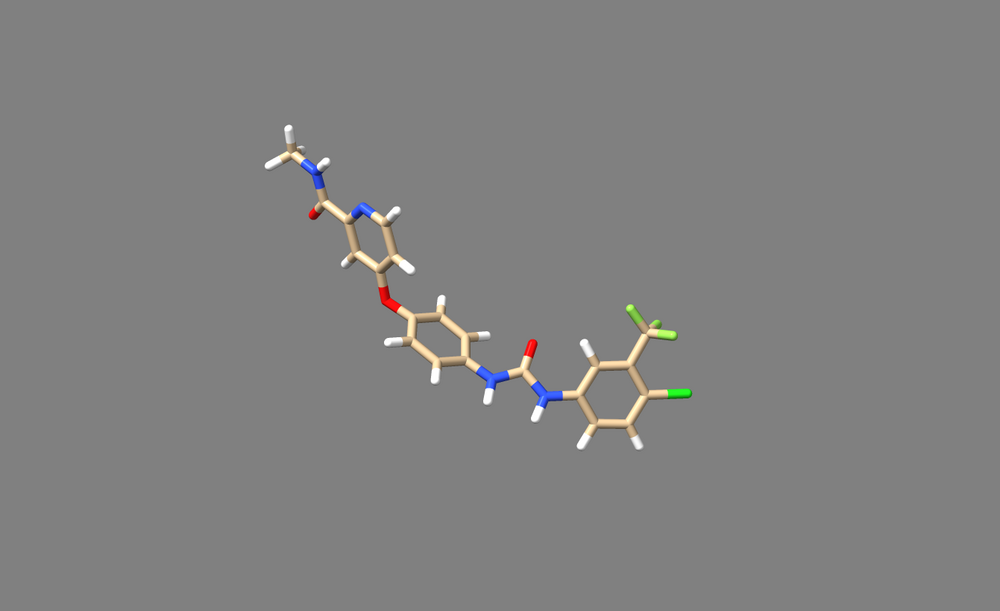
5. Type "addh"
6. Return to the paper, and check whether the hydrogens added by ChimeraX is accurate to the actual chemistry. Be considerate of any diagrams depicting hbonds or charge-charge interactions when looking for clues. Also be mindful of pH of the solution used to generate crystals. In the case of 3WZE, the hydrogens added by Addh are correct.
7. Save the ligand as a mol2 file.
8. Open it in a text viewer such as Text Editor, or open it from the command line with commands like "vi" or "nano"
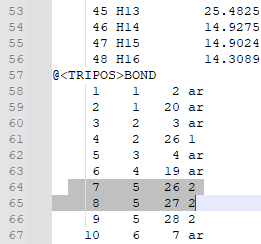
9. Check that the bonds are correct. For this particular ligand, bonds 7 and 8 were erroneously labeled as double bonds when they should be amide bonds, and the corresponding Nitrogen atoms (N12 and N14, or atoms 26 and 27 in the mol2 file) are labeled as “N.pl3” instead of “N.am”.
10. Change the “2” in the last column of bond 7’s and bond 8’s rows (shown below) to “am”. This will change the double bond to an amide bond.
Change the “N.pl3” to “N.am” in the rows for atoms 26 and 27. This will make Nitrogen 12 and 14 into amide nitrogens as they should be.
11. Save the new mol2 file
12. Open the mol2 in ChimeraX
13. With most ligands, you should be able to simply type “addcharge” to assign charges to each atom and save as a mol2 file. However, doing that with this molecule will erroneously assign a +1 charge somewhere and yield an error message. To avoid that, force ChimeraX to assign a neutral charge by typing “addcharge nonstd :BAX BAX 0”
14. Save the molecule as a final mol2 file.
Surface & Spheres
At this stage, move directories to Seawulf.
Surface Generation
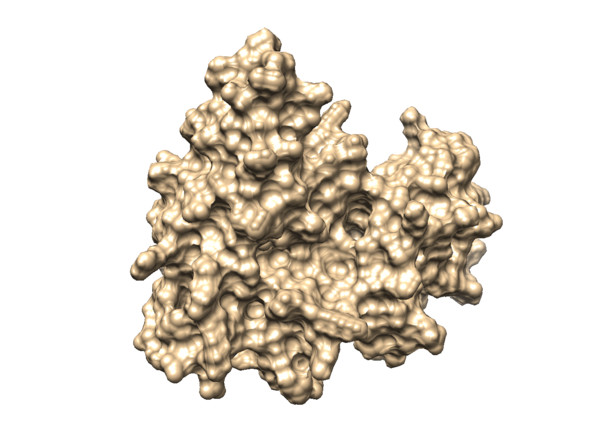
The generation of the surface of the receptor protein will have better visualization of the binding site of the receptor. In order to do so, load the mol2 file of 3WZE receptor without hydrogens in Chimera:
Action < Surface < show
Then you will be able to visualize the surface of your protein in Chimera, it will be like something in the image below:
Then we will save the dms(molecular surface) file as 3WZE_rec.dms, which will be used in the next step of spheres generation:
Tools < Structure Editing < Write DMS
Move the generated DMS file to the 002_surface_spheres folder on Seawulf.
Change current working directory in terminal for sphere generation and selection:
cd 002_surface_spheres
ChimeraX:
Unfortunately, ChimeraX cannot save a surface as a .dms file, so this section must be completed in Chimera.
Spheres Generation
First create a new file “INSPH” by typing the following into terminal:
vi INSPH
Note that the name "INSPH" is not arbitrary. Attempting to use a differently named input file will yield an error message.
Type the following information into this file (anything after # are comments that are references for reading only, and should not be putting into the file) :
 3WZE_rec.dms  #Molecular Surface file
 R             #This line specifies whether to make the spheres in the model’s exterior (R) or interior (L)
 X             #Specifies that the surface points from the dms file should be used for making spheres(?)
 0             #Minimum radius between spheres
 4.0           #Max radius of each sphere
 1.4           #Minimum radius of each sphere
 3WZE.sph      #Name of the output file that will be made
Then save the file and run the following command on terminal: note that if you want to re-run this command, make sure you remove file “OUTSPH” before your re-run because this file cannot be overwritten. Also remove any temp files that sphgen made. Also bear in mind that sphgen will crash if your protein is too big (greater than ~900 amino acids), so if you're getting an error message, try deleting part of your protein which isn't needed for docking before generating the surface and trying to generate spheres.
sphgen -i INSPH -o OUTSPH
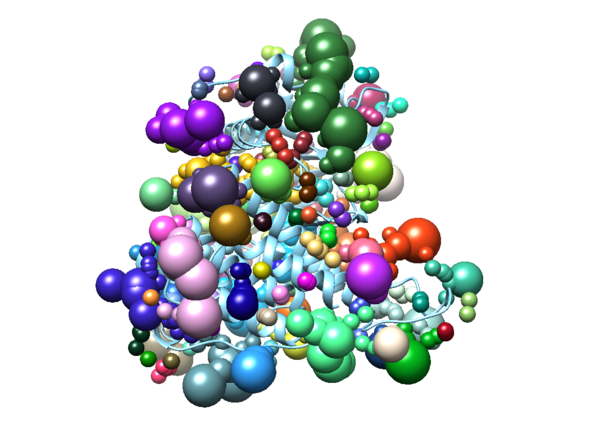
The output file “3WZE.sph” can be visualized by using Chimera, load the output file along with the receptor protein mol2 file, the two structures should be overlapping:
Spheres selection
Since we are only interested in what’s happening in the binding site, we will remove spheres that are far away from the ligand. To do so, use the following command and an output file “selected_spheres.sph” will be generated:
 sphere_selector 3WZE.sph 3WZE_lig.mol2 10.0
 #sphere_selector [sphere output file] [ligand mol2 file] [radius for distance from ligand]
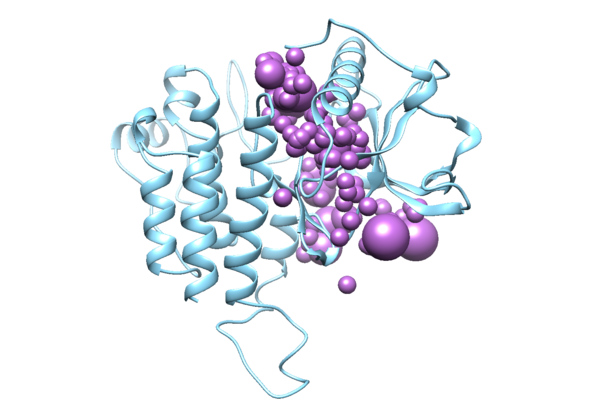
Open this file in Chimera along with the receptor file, you will see something like this:
Box and Grid
Change the current working directory in terminal for box and grid generation:
cd 003_gridbox
Box generation
First we will generate a box that will be used to generate the grid. To generate a box, we will need to create a new file “showbox.in” by using the following command:
vi showbox.in
Then type the following information into the file (anything after # are comments that are references for reading only, and should not be putting into the file) :
   Y                                              #Indicates that we want to make a box
   8.0                                            #Extra length beyond the spheres to be included by the box in all directions
   ../002_surface_spheres/selected_spheres.sph    #Indicates that the box should be constructed to encompass the spheres in this file.
   1                                              #This specifies which cluster of spheres should be used to generate the box.
   3WZE.box.pdb                                   #Name of output file
Then, run the following code to get the boxed structure:
showbox < showbox.in
Grid generation
Create a new file “grid.in” by using the following command:
vi grid.in
Then type the following information into the file:
 allow_non_integral_charges                no
 compute_grids                             yes
 grid_spacing                              0.4
 output_molecule                           no
 contact_score                             no
 energy_score                              yes
 energy_cutoff_distance                    9999
 atom_model                                a
 attractive_exponent                       6
 repulsive_exponent                        9
 distance_dielectric                       yes
 dielectric_factor                         4
 allow_non_integral_charges                yes
 bump_filter                               yes
 bump_overlap                              0.75
 receptor_file                             3WZE_rec.mol2
 box_file                                  3WZE.box.pdb
 vdw_definition_file                       /gpfs/projects/AMS536/zzz.programs/dock6.10/parameters/vdw_AMBER_parm99.defn
 score_grid_prefix                         grid
Then generate the grid by typing the following command:
grid -i grid.in -o gridinfo.out
This will generate three files: “gridinfo.out”, “grid.bmp”, and “grid.nrg”. Open “gridinfo.out” and check if the information about the receptor matches the that from the paper and your previous preparations. Also check to make sure there are no error messages at the bottom.
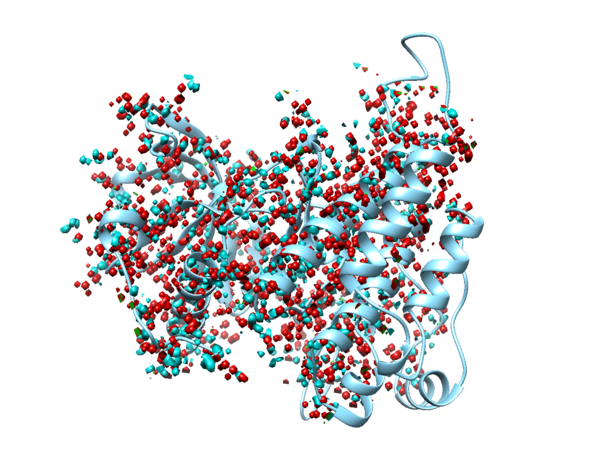
Open "grid.nrg" and receptor file in Chimera, we will be able to see the energy grid of the protein:
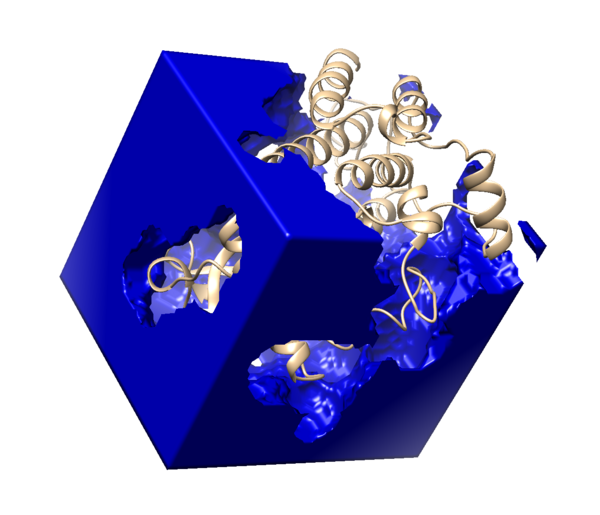
Open "grid.bmp" and receptor file in Chimera, we will be able to see the bump grid of the protein:
Energy minimization
Change the current working directory in terminal to do preparation for DOCK:
cd 004_dock
You may want to move over grid.nrg and grid.bmp as well.
To improve the accuracy of DOCK calculation of ligand protein binding, we will have to minimize the potential energy of the ligand. To do so, create a new file “min.in” by using the following command:
vi min.in
Then type the following information into the file:
 conformer_search_type                                        rigid
 use_internal_energy                                          yes
 internal_energy_rep_exp                                      12
 internal_energy_cutoff                                       100.0
 ligand_atom_file                                             ../000_files/3WZE_lig_wH.mol2
 limit_max_ligands                                            no
 skip_molecule                                                no
 read_mol_solvation                                           no
 calculate_rmsd                                               yes
 use_rmsd_reference_mol                                       yes
 rmsd_reference_filename                                      ../000_files/3WZE_lig_wH.mol2
 use_database_filter                                          no
 orient_ligand                                                no
 bump_filter                                                  no
 score_molecules                                              yes
 contact_score_primary                                        no
 contact_score_secondary                                      no
 grid_score_primary                                           yes
 grid_score_secondary                                         no
 grid_score_rep_rad_scale                                     1
 grid_score_vdw_scale                                         1
 grid_score_es_scale                                          1
 grid_score_grid_prefix                                       grid
 multigrid_score_secondary                                    no
 dock3.5_score_secondary                                      no
 continuous_score_secondary                                   no
 footprint_similarity_score_secondary                         no
 pharmacophore_score_secondary                                no
 descriptor_score_secondary                                   no
 gbsa_zou_score_secondary                                     no
 gbsa_hawkins_score_secondary                                 no
 SASA_score_secondary                                         no
 amber_score_secondary                                        no
 minimize_ligand                                              yes
 simplex_max_iterations                                       1000
 simplex_tors_premin_iterations                               0
 simplex_max_cycles                                           1
 simplex_score_converge                                       0.1
 simplex_cycle_converge                                       1.0
 simplex_trans_step                                           1.0
 simplex_rot_step                                             0.1
 simplex_tors_step                                            10.0
 simplex_random_seed                                          0
 simplex_restraint_min                                        yes
 simplex_coefficient_restraint                                10.0
 atom_model                                                   all
 vdw_defn_file                                                /gpfs/projects/AMS536/zzz.programs/dock6.10/parameters/vdw_AMBER_parm99.defn
 flex_defn_file                                               /gpfs/projects/AMS536/zzz.programs/dock6.10/parameters/flex.defn
 flex_drive_file                                              /gpfs/projects/AMS536/zzz.programs/dock6.10/parameters/flex_drive.tbl
 ligand_outfile_prefix                                        3WZE.lig.min
 write_orientations                                           no
 num_scored_conformers                                        1
 rank_ligands                                                 no
Then run the following command through the use of DOCK:
dock6 -i min.in -o min.out
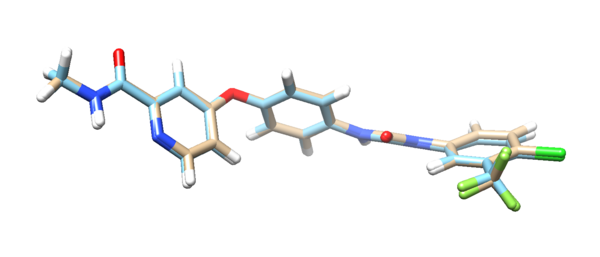
The output file “3WZE.lig.min_scored.mol2”(tan) is the potential energy minimized version of the ligand. Load this file along with ligand mol2 file(blue) in Chimera, you can compare the two molecules:
Reproducing the PDB's binding with DOCK
Change the current directory to perform DOCK:
cd 004_dock
Rigid Docking
This is computationally least expensive since the ligand will be stable, no rotational degrees will be taken into consideration. The energy minimized ligand mol2 file will be used in this simulation. First we will need to create a new file “rigid.in”:
vi rigid.in
Type the following information into the new file:
 conformer_search_type                                        rigid
 use_internal_energy                                          yes
 ligand_atom_file                                             3WZE.lig.min_scored.mol2
 limit_max_ligands                                            no
 skip_molecule                                                no
 read_mol_solvation                                           no
 calculate_rmsd                                               yes
 use_rmsd_reference_mol                                       yes
 rmsd_reference_filename                                      3WZE.lig.min_scored.mol2
 use_database_filter                                          no
 orient_ligand                                                yes
 automated_matching                                           yes
 receptor_site_file                                           ../002_surface_spheres/selected_spheres.sph
 max_orientations                                             1000
 critical_points                                              no
 chemical_matching                                            no
 use_ligand_spheres                                           no
 bump_filter                                                  no
 score_molecules                                              yes
 contact_score_primary                                        no
 contact_score_secondary                                      no
 grid_score_primary                                           yes
 grid_score_secondary                                         no
 grid_score_rep_rad_scale                                     1
 grid_score_vdw_scale                                         1
 grid_score_es_scale                                          1
 grid_score_grid_prefix                                       ../003_gridbox/grid
 multigrid_score_secondary                                    no
 dock3.5_score_secondary                                      no
 continuous_score_secondary                                   no
 footprint_similarity_score_secondary                         no
 pharmacophore_score_secondary                                no
 descriptor_score_secondary                                   no
 gbsa_zou_score_secondary                                     no
 gbsa_hawkins_score_secondary                                 no
 SASA_score_secondary                                         no
 amber_score_secondary                                        no
 minimize_ligand                                              yes
 simplex_max_iterations                                       1000
 simplex_tors_premin_iterations                               0
 simplex_max_cycles                                           1
 simplex_score_converge                                       0.1
 simplex_cycle_converge                                       1.0
 simplex_trans_step                                           1.0
 simplex_rot_step                                             0.1
 simplex_tors_step                                            10.0
 simplex_random_seed                                          0
 simplex_restraint_min                                        no
 atom_model                                                   all
 vdw_defn_file                                                /gpfs/projects/AMS536/zzz.programs/dock6.10/parameters/vdw_AMBER_parm99.defn
 flex_defn_file                                               /gpfs/projects/AMS536/zzz.programs/dock6.10/parameters/flex.defn
 flex_drive_file                                              /gpfs/projects/AMS536/zzz.programs/dock6.10/parameters/flex_drive.tbl
 ligand_outfile_prefix                                        rigid.out
 write_orientations                                           no
 num_scored_conformers                                        1
 rank_ligands                                                 no
Then run the following command:
dock6 -i rigid.in -o rigid.out
If the inputs are all correct, there will be a new output file “rigid.out_scored.mol2”.
Fixed Anchor Docking
In fixed anchor docking, most part of the ligand will remain fixed, and the rest will have some rotational freedom. First create a new file “fixed.in”:
vi fixed.in
Then type the following into the file:
 conformer_search_type                                        flex
 user_specified_anchor                                        no
 limit_max_anchors                                            no
 min_anchor_size                                              5
 pruning_use_clustering                                       yes
 pruning_max_orients                                          1000
 pruning_clustering_cutoff                                    100
 pruning_conformer_score_cutoff                               100.0
 pruning_conformer_score_scaling_factor                       1.0
 use_clash_overlap                                            no
 write_growth_tree                                            no
 write_fragment_libraries                                     no
 use_internal_energy                                          yes
 internal_energy_rep_exp                                      12
 internal_energy_cutoff                                       100.0
 ligand_atom_file                                             ../001_structure/3WZE_lig.mol2
 limit_max_ligands                                            no
 skip_molecule                                                no
 read_mol_solvation                                           no
 calculate_rmsd                                               yes
 use_rmsd_reference_mol                                       yes
 rmsd_reference_filename                                      ../001_structure/3WZE_lig.mol2
 use_database_filter                                          no
 orient_ligand                                                no
 bump_filter                                                  no
 score_molecules                                              yes
 contact_score_primary                                        no
 contact_score_secondary                                      no
 grid_score_primary                                           yes
 grid_score_secondary                                         no
 grid_score_rep_rad_scale                                     1
 grid_score_vdw_scale                                         1
 grid_score_es_scale                                          1
 grid_score_grid_prefix                                       grid
 multigrid_score_secondary                                    no
 dock3.5_score_secondary                                      no
 continuous_score_secondary                                   no
 footprint_similarity_score_secondary                         no
 pharmacophore_score_secondary                                no
 descriptor_score_secondary                                   no
 gbsa_zou_score_secondary                                     no
 gbsa_hawkins_score_secondary                                 no
 SASA_score_secondary                                         no
 amber_score_secondary                                        no
 minimize_ligand                                              yes
 minimize_anchor                                              yes
 minimize_flexible_growth                                     yes
 use_advanced_simplex_parameters                              no
 simplex_max_cycles                                           1
 simplex_score_converge                                       0.1
 simplex_cycle_converge                                       1.0
 simplex_trans_step                                           1.0
 simplex_rot_step                                             0.1
 simplex_tors_step                                            10.0
 simplex_anchor_max_iterations                                500
 simplex_grow_max_iterations                                  500
 simplex_grow_tors_premin_iterations                          0
 simplex_random_seed                                          0
 simplex_restraint_min                                        no
 atom_model                                                   all
 vdw_defn_file                                                /gpfs/projects/AMS536/zzz.programs/dock6.10/parameters/vdw_AMBER_parm99.defn
 flex_defn_file                                               /gpfs/projects/AMS536/zzz.programs/dock6.10/parameters/flex.defn
 flex_drive_file                                              /gpfs/projects/AMS536/zzz.programs/dock6.10/parameters/flex_drive.tbl
 ligand_outfile_prefix                                        fixed.out
 write_orientations                                           no
 num_scored_conformers                                        100
 write_conformations                                          no
 cluster_conformations                                        yes
 cluster_rmsd_threshold                                       2.0
 rank_ligands                                                 no
Then run the following command:
dock6 -i fixed.in -o fixed.out
If the inputs are all correct, there will be a new output file “fixed.out_scored.mol2”.
Flexible Docking
Flexible docking is the computationally most expensive out of the three types of docking we introduced. Full rotational freedom and internal degrees of freedom are being considered. First creat a new file “flex.in”:
vi flex.in
Type the following information into the file:
 conformer_search_type                                        flex
 user_specified_anchor                                        no
 limit_max_anchors                                            no
 min_anchor_size                                              5
 pruning_use_clustering                                       yes
 pruning_max_orients                                          1000
 pruning_clustering_cutoff                                    100
 pruning_conformer_score_cutoff                               100.0
 pruning_conformer_score_scaling_factor                       1.0
 use_clash_overlap                                            no
 write_growth_tree                                            no
 write_fragment_libraries                                     no
 use_internal_energy                                          yes
 internal_energy_rep_exp                                      12
 internal_energy_cutoff                                       100.0
 ligand_atom_file                                             3WZE.lig.min_scored.mol2
 limit_max_ligands                                            no
 skip_molecule                                                no
 read_mol_solvation                                           no
 calculate_rmsd                                               yes
 use_rmsd_reference_mol                                       yes
 rmsd_reference_filename                                      3WZE.lig.min_scored.mol2
 use_database_filter                                          no
 orient_ligand                                                yes
 automated_matching                                           yes
 receptor_site_file                                           ../002_surface_spheres/selected_spheres.sph
 max_orientations                                             1000
 critical_points                                              no
 chemical_matching                                            no
 use_ligand_spheres                                           no
 bump_filter                                                  no
 score_molecules                                              yes
 contact_score_primary                                        no
 contact_score_secondary                                      no
 grid_score_primary                                           yes
 grid_score_secondary                                         no
 grid_score_rep_rad_scale                                     1
 grid_score_vdw_scale                                         1
 grid_score_es_scale                                          1
 grid_score_grid_prefix                                       grid
 multigrid_score_secondary                                    no
 dock3.5_score_secondary                                      no
 continuous_score_secondary                                   no
 footprint_similarity_score_secondary                         no
 pharmacophore_score_secondary                                no
 descriptor_score_secondary                                   no
 gbsa_zou_score_secondary                                     no
 gbsa_hawkins_score_secondary                                 no
 SASA_score_secondary                                         no
 amber_score_secondary                                        no
 minimize_ligand                                              yes
 minimize_anchor                                              yes
 minimize_flexible_growth                                     yes
 use_advanced_simplex_parameters                              no
 simplex_max_cycles                                           1
 simplex_score_converge                                       0.1
 simplex_cycle_converge                                       1.0
 simplex_trans_step                                           1.0
 simplex_rot_step                                             0.1
 simplex_tors_step                                            10.0
 simplex_anchor_max_iterations                                500
 simplex_grow_max_iterations                                  500
 simplex_grow_tors_premin_iterations                          0
 simplex_random_seed                                          0
 simplex_restraint_min                                        no
 atom_model                                                   all
 vdw_defn_file                                                /gpfs/projects/AMS536/zzz.programs/dock6.10/parameters/vdw_AMBER_parm99.defn
 flex_defn_file                                               /gpfs/projects/AMS536/zzz.programs/dock6.10/parameters/flex.defn
 flex_drive_file                                              /gpfs/projects/AMS536/zzz.programs/dock6.10/parameters/flex_drive.tbl
 ligand_outfile_prefix                                        flex.out
 write_orientations                                           no
 num_scored_conformers                                        1
 rank_ligands                                                 no
Then run the following command:
dock6 -i flex.in -o flex.out
If the inputs are all correct, there will be a new output file “flex.out_scored.mol2”.
Footprinting
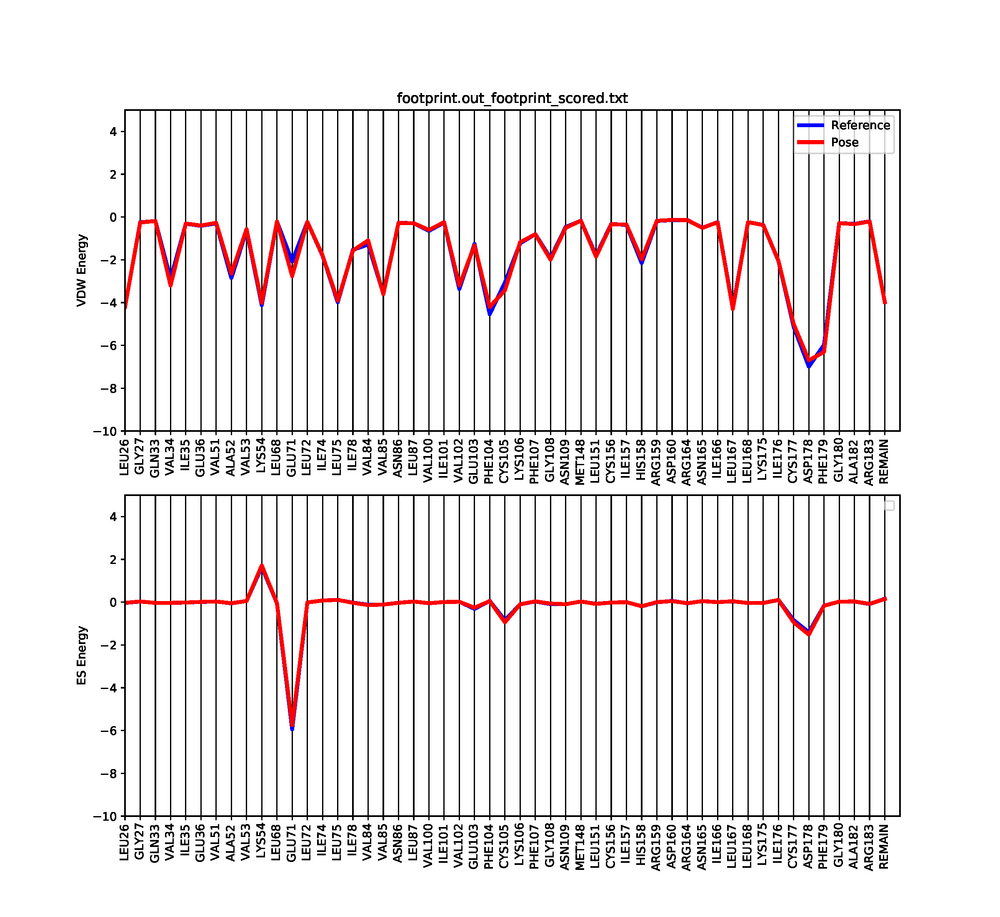
Dock6 has a feature in which we can visualize both the electrostatic and Van der interactions between the ligand and protein. This will show which amino acids are contributing to the binding of the ligand to the protein.
To determine the molecular footprint, create the following input file in your DOCK directory:
cd 004_dock
vi footprint.in
Copy the following into your file:
  conformer_search_type                                        rigid
  use_internal_energy                                          no
  ligand_atom_file                                             3WZE.lig.min_scored.mol2
  limit_max_ligands                                            no
  skip_molecule                                                no
  read_mol_solvation                                           no
  calculate_rmsd                                               no
  use_database_filter                                          no
  orient_ligand                                                no
  bump_filter                                                  no
  score_molecules                                              yes
  contact_score_primary                                        no
  contact_score_secondary                                      no
  grid_score_primary                                           no
  grid_score_secondary                                         no
  multigrid_score_primary                                      no
  multigrid_score_secondary                                    no
  dock3.5_score_primary                                        no
  dock3.5_score_secondary                                      no
  continuous_score_primary                                     no
  continuous_score_secondary                                   no
  footprint_similarity_score_primary                           yes
  footprint_similarity_score_secondary                         no
  fps_score_use_footprint_reference_mol2                       yes
  fps_score_footprint_reference_mol2_filename                  ../001_structure/3wze.lig.wH.am1bcc.mol2
  fps_score_foot_compare_type                                  Euclidean
  fps_score_normalize_foot                                     no
  fps_score_foot_comp_all_residue                              yes
  fps_score_receptor_filename                                  ../001_structure/3wze_rec_wH.mol2
  fps_score_vdw_att_exp                                        6
  fps_score_vdw_rep_exp                                        9
  fps_score_vdw_rep_rad_scale                                  1
  fps_score_use_distance_dependent_dielectric                  yes
  fps_score_dielectric                                         4.0
  fps_score_vdw_fp_scale                                       1
  fps_score_es_fp_scale                                        1
  fps_score_hb_fp_scale                                        0
  pharmacophore_score_secondary                                no
  descriptor_score_secondary                                   no
  gbsa_zou_score_secondary                                     no
  gbsa_hawkins_score_secondary                                 no
  SASA_score_secondary                                         no
  amber_score_secondary                                        no
  minimize_ligand                                              no
  atom_model                                                   all
  vdw_defn_file                                                /gpfs/projects/AMS536/zzz.programs/dock6.10/parameters/vdw_AMBER_parm99.defn
  flex_defn_file                                               /gpfs/projects/AMS536/zzz.programs/dock6.10/parameters/flex.defn
  flex_drive_file                                              /gpfs/projects/AMS536/zzz.programs/dock6.10/parameters/flex_drive.tbl
  ligand_outfile_prefix                                        footprint.out
  write_footprints                                             yes
  write_hbonds                                                 yes
  write_orientations                                           no
  num_scored_conformers                                        1
  rank_ligands                                                 no
In order to run the footprint calculation, type:
dock6 -i footprint.in -o footprint.out
An error might occur when running footprint with dock, but that is fine. Three files will be generated after a successful run. The files that are generated are footprint.out_footprint_scored.txt footprint.out_hbond_scored.txt footprint.out_scored.mol2. In order to visualize the molecular footprint we need to use a python script provided here a prewritten python script. To run the script just do:
python plot_footprint_single_magnitude.py footprint.out_footprint_scored.txt 50
This python script will generate a graph that shows the Van der Waals and Electrostatic contributions of the 50 most contributing amino acids. Use a pdf viewer to visualize the graph you just created. It should look similar to this:
Virtual Screen
By having a predetermined compound library, virtual screening in DOCK can score these in the compound library based on the input parameters. In this case, we used a smaller library “VS_library_25K.mol2” that was provided by the instructor . Change the current working directory and make sure “VS_library_25K.mol2” is copied to this directory:
cd 005_virtual_screen
First create a new file “virtual.in” for inputting virtual screening parameters:
vi virtual.in
Then type the following information into the file:
 conformer_search_type                                        flex
 user_specified_anchor                                        no
 limit_max_anchors                                            no
 min_anchor_size                                              5
 pruning_use_clustering                                       yes
 pruning_max_orients                                          1000
 pruning_clustering_cutoff                                    100
 pruning_conformer_score_cutoff                               100.0
 pruning_conformer_score_scaling_factor                       1.0
 use_clash_overlap                                            no
 write_growth_tree                                            no
 write_fragment_libraries                                     no
 use_internal_energy                                          yes
 internal_energy_rep_exp                                      12
 internal_energy_cutoff                                       100.0
 ligand_atom_file                                             VS_library_25K.mol2
 limit_max_ligands                                            no
 skip_molecule                                                no
 read_mol_solvation                                           no
 calculate_rmsd                                               no
 use_database_filter                                          no
 orient_ligand                                                yes
 automated_matching                                           yes
 receptor_site_file                                           ../002_surface_spheres/selected_spheres.sph
 max_orientations                                             1000
 critical_points                                              no
 chemical_matching                                            no
 use_ligand_spheres                                           no
 bump_filter                                                  no
 score_molecules                                              yes
 contact_score_primary                                        no
 contact_score_secondary                                      no
 grid_score_primary                                           yes
 grid_score_secondary                                         no
 grid_score_rep_rad_scale                                     1
 grid_score_vdw_scale                                         1
 grid_score_es_scale                                          1
 grid_score_grid_prefix                                       ../003_gridbox/grid
 multigrid_score_secondary                                    no
 dock3.5_score_secondary                                      no
 continuous_score_secondary                                   no
 footprint_similarity_score_secondary                         no
 pharmacophore_score_secondary                                no
 descriptor_score_secondary                                   no
 gbsa_zou_score_secondary                                     no
 gbsa_hawkins_score_secondary                                 no
 SASA_score_secondary                                         no
 amber_score_secondary                                        no
 minimize_ligand                                              yes
 minimize_anchor                                              yes
 minimize_flexible_growth                                     yes
 use_advanced_simplex_parameters                              no
 simplex_max_cycles                                           1
 simplex_score_converge                                       0.1
 simplex_cycle_converge                                       1.0
 simplex_trans_step                                           1.0
 simplex_rot_step                                             0.1
 simplex_tors_step                                            10.0
 simplex_anchor_max_iterations                                500
 simplex_grow_max_iterations                                  500
 simplex_grow_tors_premin_iterations                          0
 simplex_random_seed                                          0
 simplex_restraint_min                                        no
 atom_model                                                   all
 vdw_defn_file                                                /gpfs/projects/AMS536/zzz.programs/dock6.10/parameters/vdw_AMBER_parm99.defn
 flex_defn_file                                               /gpfs/projects/AMS536/zzz.programs/dock6.10/parameters/flex.defn
 flex_drive_file                                              /gpfs/projects/AMS536/zzz.programs/dock6.10/parameters/flex_drive.tbl
 ligand_outfile_prefix                                        virtual.out
 write_orientations                                           no
 num_scored_conformers                                        1
 rank_ligands                                                 no
Type the following command:
dock6 -i virtual.in
If the command runs successfully, the file "virtual.in" has set up successfully. We then move to another working directory, and make sure both files "virtual.in" and “VS_library_25K.mol2” is in this directory:
cd 006_virtual_screen_mpi
To prevent overload of the current working load and speed up the process, we can write the code for virtual screening along with requesting more nodes in s shell script and submit the job. To do so, first create a new file “virtual.sh”:
vi virtual.sh
Then type the following information into this file:
 #!/bin/bash
 #SBATCH --time=5:00:00
 #SBATCH --nodes=4
 #SBATCH --ntasks=112
 #SBATCH --job-name=3WZE_flex_dock
 #SBATCH --output=3WZE_flex_dock
 #SBATCH -p long-28core
 mpirun -np 112 dock6.mpi -i virtual.in -o 3WZE.virtual.mpi.out
Then submit the job by typing the following command:
sbatch virtual.sh
Since we specified the number of task to be 112, we are expecting to see 112 output files, name in the format "virtual.out.xxx". In addition, the output contains a mol2 file with all 112 virtual screening results inside.
Cartesian Energy Minimization
Change the current working directory to perform cartesian energy minimization:
cd 007_cartesian_min
We have to perform energy minimization on the virtual screening results before analyzing. First, create a new file “cart_min.in”:
vi cart_min.in
Then type the following information into the file:
 conformer_search_type                                        rigid
 use_internal_energy                                          yes
 internal_energy_rep_exp                                      12
 internal_energy_cutoff                                       100.0
 ligand_atom_file                                             ../006_virtual_screen_mpi/3WZE_virtual.out_scored.mol2
 limit_max_ligands                                            no
 skip_molecule                                                no
 read_mol_solvation                                           no
 calculate_rmsd                                               no
 use_database_filter                                          no
 orient_ligand                                                no
 bump_filter                                                  no
 score_molecules                                              yes
 contact_score_primary                                        no
 contact_score_secondary                                      no
 grid_score_primary                                           no
 grid_score_secondary                                         no
 multigrid_score_primary                                      no
 multigrid_score_secondary                                    no
 dock3.5_score_primary                                        no
 dock3.5_score_secondary                                      no
 continuous_score_primary                                     yes
 continuous_score_secondary                                   no
 cont_score_rec_filename                                      ../001_structure/3WZE_rec.mol2
 cont_score_att_exp                                           6
 cont_score_rep_exp                                           12
 cont_score_rep_rad_scale                                     1
 cont_score_use_dist_dep_dielectric                           yes
 cont_score_dielectric                                        4.0
 cont_score_vdw_scale                                         1
 cont_score_es_scale                                          1
 footprint_similarity_score_secondary                         no
 pharmacophore_score_secondary                                no
 descriptor_score_secondary                                   no
 gbsa_zou_score_secondary                                     no
 gbsa_hawkins_score_secondary                                 no
 SASA_score_secondary                                         no
 amber_score_secondary                                        no
 minimize_ligand                                              yes
 simplex_max_iterations                                       1000
 simplex_tors_premin_iterations                               0
 simplex_max_cycles                                           1
 simplex_score_converge                                       0.1
 simplex_cycle_converge                                       1.0
 simplex_trans_step                                           1.0
 simplex_rot_step                                             0.1
 simplex_tors_step                                            10.0
 simplex_random_seed                                          0
 simplex_restraint_min                                        no
 atom_model                                                   all
 vdw_defn_file                                                /gpfs/projects/AMS536/zzz.programs/dock6.10/parameters/vdw_AMBER_parm99.defn
 flex_defn_file                                               /gpfs/projects/AMS536/zzz.programs/dock6.10/parameters/flex.defn
 flex_drive_file                                              /gpfs/projects/AMS536/zzz.programs/dock6.10/parameters/flex_drive.tbl
 ligand_outfile_prefix                                        3WZE.virtualscreen_cart.min
 write_orientations                                           no
 num_scored_conformers                                        1
 rank_ligands                                                 no
Then we write a new shell script “cart_min.sh” to request node and run the code to prevent overflow:
vi cart_min.sh
The following lines should be included in the shell file:
 #!/bin/bash
 #SBATCH --time=10:00:00
 #SBATCH --nodes=4
 #SBATCH --ntasks=112
 #SBATCH --job-name=3WZE_flex_dock
 #SBATCH --output=3WZE_flex_dock
 #SBATCH -p long-28core
 mpirun -np 112 dock6.mpi -i cart_min.in -o 3WZE_cart_min.virtual.mpi.out
Then submit the job by running the following command:
sbatch cart_min.sh
We then will be able to see the results.
Rescoring the Virtual Screen
Change the working directory to perform rescoring:
cd 008_rescore
We can rescore the Cartesian energy minimized virtual screening results. This can rank the results based on user defined molecular properties. To do so, make a new file “rescore.in”:
vi rescore.in
Then type the following information into the file:
 conformer_search_type                                        rigid
 use_internal_energy                                          yes
 internal_energy_rep_exp                                      12
 internal_energy_cutoff                                       100.0
 ligand_atom_file                                             ../007_cartesian_min/3WZE.virtual_screen.min_scored.mol2
 limit_max_ligands                                            no
 skip_molecule                                                no
 read_mol_solvation                                           no
 calculate_rmsd                                               no
 use_database_filter                                          no
 orient_ligand                                                no
 bump_filter                                                  no
 score_molecules                                              yes
 contact_score_primary                                        no
 contact_score_secondary                                      no
 grid_score_primary                                           no
 grid_score_secondary                                         no
 multigrid_score_primary                                      no
 multigrid_score_secondary                                    no
 dock3.5_score_primary                                        no
 dock3.5_score_secondary                                      no
 continuous_score_primary                                     no
 continuous_score_secondary                                   no
 footprint_similarity_score_primary                           no
 footprint_similarity_score_secondary                         no
 pharmacophore_score_primary                                  no
 pharmacophore_score_secondary                                no
 descriptor_score_primary                                     yes
 descriptor_score_secondary                                   no
 descriptor_use_grid_score                                    no
 descriptor_use_multigrid_score                               no
 descriptor_use_continuous_score                              no
 descriptor_use_footprint_similarity                          yes
 descriptor_use_pharmacophore_score                           yes
 descriptor_use_tanimoto                                      yes
 descriptor_use_hungarian                                     yes
 descriptor_use_volume_overlap                                yes
 descriptor_fps_score_use_footprint_reference_mol2            yes
 descriptor_fps_score_footprint_reference_mol2_filename       ../004_dock/3wze.lig.min_scored.mol2
 descriptor_fps_score_foot_compare_type                       Euclidean
 descriptor_fps_score_normalize_foot                          no
 descriptor_fps_score_foot_comp_all_residue                   yes
 descriptor_fps_score_receptor_filename                       ../001_structure/3wze_rec.mol2
 descriptor_fps_score_vdw_att_exp                             6
 descriptor_fps_score_vdw_rep_exp                             12
 descriptor_fps_score_vdw_rep_rad_scale                       1
 descriptor_fps_score_use_distance_dependent_dielectric       yes
 descriptor_fps_score_dielectric                              4.0
 descriptor_fps_score_vdw_fp_scale                            1
 descriptor_fps_score_es_fp_scale                             1
 descriptor_fps_score_hb_fp_scale                             0
 descriptor_fms_score_use_ref_mol2                            yes
 descriptor_fms_score_ref_mol2_filename                       ../004_dock/3wze.lig.min_scored.mol2
 descriptor_fms_score_write_reference_pharmacophore_mol2      no
 descriptor_fms_score_write_reference_pharmacophore_txt       no
 descriptor_fms_score_write_candidate_pharmacophore           no
 descriptor_fms_score_write_matched_pharmacophore             no
 descriptor_fms_score_compare_type                            overlap
 descriptor_fms_score_full_match                              yes
 descriptor_fms_score_match_rate_weight                       5.0
 descriptor_fms_score_match_dist_cutoff                       1.0
 descriptor_fms_score_match_proj_cutoff                       0.7071
 descriptor_fms_score_max_score                               20
 descriptor_fingerprint_ref_filename                          ../004_dock/3wze.lig.min_scored.mol2
 descriptor_hms_score_ref_filename                            ../004_dock/3wze.lig.min_scored.mol2
 descriptor_hms_score_matching_coeff                          -5
 descriptor_hms_score_rmsd_coeff                              1
 descriptor_volume_score_reference_mol2_filename              ../004_dock/3wze.lig.min_scored.mol2
 descriptor_volume_score_overlap_compute_method               analytical
 descriptor_weight_fps_score                                  1
 descriptor_weight_pharmacophore_score                        1
 descriptor_weight_fingerprint_tanimoto                       -1
 descriptor_weight_hms_score                                  1
 descriptor_weight_volume_overlap_score                       -1
 gbsa_zou_score_secondary                                     no
 gbsa_hawkins_score_secondary                                 no
 SASA_score_secondary                                         no
 amber_score_secondary                                        no
 minimize_ligand                                              no
 atom_model                                                   all
 vdw_defn_file                                                /gpfs/projects/AMS536/zzz.programs/dock6.10/parameters/vdw_AMBER_parm99.defn
 flex_defn_file                                               /gpfs/projects/AMS536/zzz.programs/dock6.10/parameters/flex.defn
 flex_drive_file                                              /gpfs/projects/AMS536/zzz.programs/dock6.10/parameters/flex_drive.tbl
 chem_defn_file                                               /gpfs/projects/AMS536/zzz.programs/dock6.10/parameters/chem.defn
 pharmacophore_defn_file                                      /gpfs/projects/AMS536/zzz.programs/dock6.10/parameters/ph4.defn
 ligand_outfile_prefix                                        descriptor.out
 write_footprints                                             yes
 write_hbonds                                                 yes
 write_orientations                                           no
 num_scored_conformers                                        1
 rank_ligands                                                 no
To prevent overload, we write a new shell script to request nodes and run the line:
vi rescore.sh
Type the following information into the file:
 #!/bin/bash
 #SBATCH --time=10:00:00
 #SBATCH --nodes=4
 #SBATCH --ntasks=112
 #SBATCH --job-name=3WZE_flex_dock
 #SBATCH --output=3WZE_flex_dock
 #SBATCH -p long-28core
 mpirun -np 112 dock6.mpi -i rescore.in -o rescore.out
Then run the following command:
sbatch rescore.sh
There will be a file “descriptor.out_scored.mol2” when the job is done. We can download the file to local and perform visual analysis by using Chimera.
