2025 DOCK GA tutorial 2 with 1XMU
Contents
Introduction
Introduced in DOCK6.10 is the genetic algorithm, a form of de novo drug design that employs molecular evolution (mutations) and an iterative natural selection process. Several fragment-based (requiring a fragment library) mutations, including cross-over, addition, deletion, substitution, and replacement, are used on the provided “parent” molecule(s) to produce a new generation of “off-spring”. Subsequently, the natural selection process uses user-defined variables to exclude “off-spring” with poor scoring (and/or lesser fitness) from being included in the next generation of “parents”.
In this section of the DOCK6.12 tutorial, we will:
- generate a fragment library
- run a genetic algorithm
- perform an analysis using USCF Chimera
Set Up
Before we begin, we should create separate directories to guide and organize our workflow.
mkdir 00X_fragLib
mkdir 00X_algorithm
Generating the Library
The genetic algorithm requires a pre-docked fragment library - an ensemble of scaffolds, linkers, and sidechains, used to mutate the ligand during the genetic algorithm. DOCK6.12 allows for the creation of a personalized fragment library via deconstruction of a chosen molecule (here, our chosen ligand).
Creating a Library Input File
Enter your new directory, create an empty input file, and access it with dock6:
cd 00X_fragLib
touch 1XMU_fragLib.in
dock6 -i 1XMU_fragLib.in
Answer the prompts using the following responses. You can also modify the example code below to match your needs.
Note: Depending on the version of dock6 that you are using, some prompts displayed here may not exist anymore, or you might encounter newer/older prompts not present.
conformer_search_type                                        	flex
write_fragment_libraries                                     	yes
fragment_library_prefix                                      	1XMU_fragLib
fragment_library_freq_cutoff                             	1
fragment_library_sort_method                                 	freq
fragment_library_trans_origin                                	no
use_internal_energy                                          	yes
internal_energy_rep_exp                                      	12
internal_energy_cutoff                                       	100.0
ligand_atom_file                                             	../00X_structure/1XMU_Lig_wCH.mol2
limit_max_ligands                                            	no
skip_molecule                                                	no
read_mol_solvation                                           	no
calculate_rmsd                                               	no
use_database_filter                                          	no
orient_ligand                                                	no
bump_filter                                                  	no
score_molecules                                              	no
atom_model                                                   	all
vdw_defn_file                                    		 /PATH/vdw_AMBER_parm99.defn
flex_defn_file                                              	 /PATH/parameters/flex.defn
flex_drive_file                                             	 /PATH/flex_drive.tbl
ligand_outfile_prefix                                        	1XMU_output
write_mol_solvation                                          	no
write_orientations                                           	no
num_scored_conformers                                        	1
score_threshold                                              	100.0
rank_ligands                                                	no
If you encounter any issues, you can always edit the file with vi/vim and then run it using:
dock6 -i 1XMU_fragLib.in -o 1XMU_fragLib.out>&1XMU_fragLib.log&
Note: This will create additional output (1XMU_fragLib.out) and log (1XMU_fragLib.log) files, which may be useful to discern errors in the input.
This process will take a few seconds and output several files:
- 1XMU_fraglib_rigid.mol2
- 1XMU_fraglib_scaffold.mol2
- 1XMU_fraglib_sidechain.mol2
- 1XMU_fraglib_linker.mol2
- 1XMU_fraglib_torenv.dat, the torsion environment file
- 1XMU_output_scored.mol2
Combining the Torsion Environment Tables
Before we continue, it is important that we update our torsion environment table. The python script, combine_torenv.py (available in the bin directory) creates a combination of two torenv.dat files.
python ${DOCK_DIR}/bin/combine_torenv.py 1XMU_fraglib_torenv.dat ${DOCK_DIR}/parameters/fraglib_torenv.dat
This will give us a “master” fragment library file (referred to as unique_full_sorted_fraglib.dat).
Running the Genetic Algorithm
Creating a Genetic Input File
Enter your next directory, create an empty input file and access it with dock6:
cd ../00X_algorithm
touch 1XMU_geneticAlgo.in
dock6 -i 1XMU_geneticAlgo.in
Answer the prompts using the following responses:
Note: Depending on the version of dock6 that you are using, some prompts displayed here may not exist anymore, or you might encounter newer/older prompts not present.
conformer_search_type                                        genetic
ga_molecule_file                                             ../../00X_structure/1XMU_Lig_wCH.mol2
ga_utilities                                                 no
ga_fraglib_scaffold_file                                     /PATH/fraglib_ga_scaffold.mol2
ga_fraglib_linker_file                                       /PATH/fraglib_linker.mol2
ga_fraglib_sidechain_file                                    /PATH/fraglib_sidechain.mol2
ga_torenv_table                                              ../00X_fragLib/unique_full_sorted_fraglib.dat
ga_max_generations                                           100
ga_xover_on                                                  yes
ga_xover_sampling_method_rand                                yes
ga_xover_max                                                 150
ga_bond_tolerance                                            0.5
ga_angle_cutoff                                              0.14
ga_check_overlap                                             no
ga_mutate_addition                                           yes
ga_mutate_deletion                                           yes
ga_mutate_substitution                                       yes
ga_mutate_replacement                                        yes
ga_mutate_parents                                            yes
ga_pmut_rate                                                 0.3
ga_omut_rate                                                 0.7
ga_max_mut_cycles                                            5
ga_mut_sampling_method                                       rand
ga_num_random_picks                                          15
ga_max_root_size                                             5
ga_energy_cutoff                                             100
ga_heur_unmatched_num                                        1
ga_heur_matched_rmsd                                         0.5
ga_constraint_mol_wt                                         500
ga_constraint_rot_bon                                        10
ga_constraint_H_accept                                       10
ga_constraint_H_don                                          5
ga_constraint_formal_charge                                  2
ga_ensemble_size                                             100
ga_selection_method                                          elitism
ga_elitism_combined                                          yes
ga_elitism_option                                            max
ga_max_num_gen_with_no_crossover                             25
ga_name_identifier                                           ga
ga_output_prefix                                             ga_output
use_internal_energy                                          yes
internal_energy_rep_exp                                      12
internal_energy_cutoff                                       100.0
use_database_filter                                          no
orient_ligand                                                no
bump_filter                                                  no
score_molecules                                              yes
contact_score_primary                                        no
grid_score_primary                                           yes
grid_score_rep_rad_scale                                     1
grid_score_vdw_scale                                         1
grid_score_es_scale                                          1
grid_lig_efficiency                                          no
grid_score_grid_prefix                                       ../00X_gridbox/grid
minimize_ligand                                              yes
minimize_anchor                                              yes
minimize_flexible_growth                                     yes
use_advanced_simplex_parameters                              no
simplex_max_cycles                                           1
simplex_score_converge                                       0.1
simplex_cycle_converge                                       1.0
simplex_trans_step                                           1.0
simplex_rot_step                                             0.1
simplex_tors_step                                            10.0
simplex_anchor_max_iterations                                500
simplex_grow_max_iterations                                  500
simplex_grow_tors_premin_iterations                          0
simplex_final_min                                            no
simplex_random_seed                                          0
simplex_restraint_min                                        no
atom_model                                                   all
vdw_defn_file                                                /PATH/vdw_AMBER_parm99.defn
flex_defn_file                                               /PATH/flex.defn
flex_drive_file                                              /PATH/flex_drive.tbl
Accessing a Slurm Queue
This process, depending on your responses, may use significant computational resources. It would be beneficial to access a partition via. slurm queue (if you are utilizing an external cluster).
If submitted to your head node, you can use the kill command to cancel it.
You can modify the example code below to match your needs and system specifications:
#!/bin/bash
#
#SBATCH --job-name=1XMU_genetic
#SBATCH --ntasks-per-node=1
#SBATCH --nodes=1
#SBATCH --time=4:00:00
#SBATCH -p short-96core
dock6 -i 1XMU_geneticAlgo.in -o 1XMU_geneticAlgo.out
Submit your job to the queue by typing:
sbatch job.slurm
Note: You can modify the job.slurm script to notify you of failures. Alternatively, you can utilize the grep command to track the generational progression of the genetic algorithm.
This process will take some time and output a large number of files, including:
- 1XMU_geneticAlgo.out
- ga_output.restart0000.mol2, the initial parent ensemble
- ga_output.restartXXXX.mol2, a set of molecules from each generation
Analysis / Conclusion
Downloading the Necessary Files
From this point, you can download (onto your local computer, using the scp command) any of the ga_output.restart files individually, or use the cat command and download the resulting file.
On your local computer, type:
scp netID@network.instuition.edu:/PATH/FILE/ /LOCATION/
Note: For very large molecular evolution processes, it may be useful to create a tarball. You can utilize additional compression tools, if desired.
While in the main directory, type:
tar -cvf 00X_algorithm algorithm.tar
On you local computer, type:
scp netID@network.instuition.edu:/PATH/algorithm.tar /LOCATION/
tar -xvf algorithm.tar
Analyzing the Genetic Algorithm Models
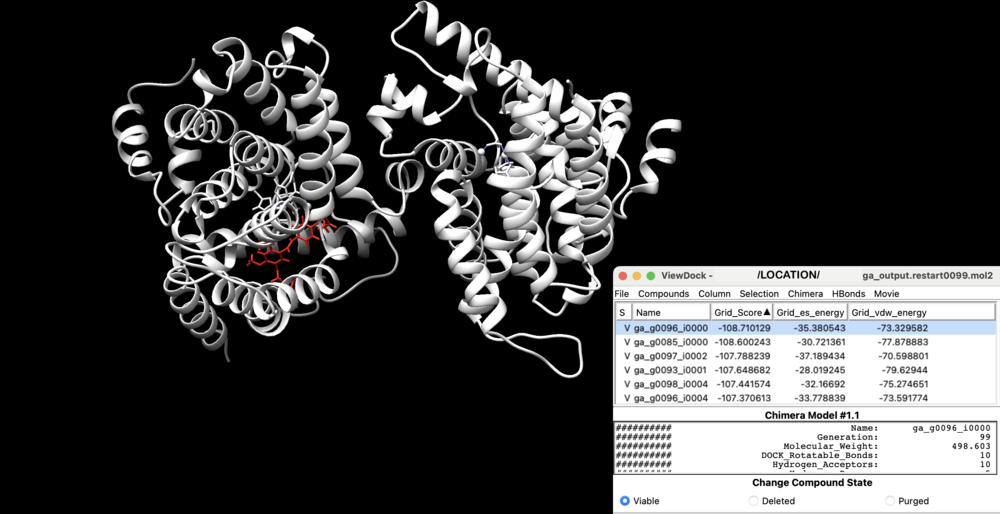
Analysis can then be performed using the UCSF Chimera visualization program. Navigate to the receptor.mol2 file’s location using : Browse (alternatively, File > Open)
Then, access the chosen generation (or concatenated) file using : ViewDock (found under Tools > Surface/Binding Analysis > ViewDock).
You may need to designate a file type for this step (in this case, choose the DOCK 4, 5, or 6 option).
You can now:
- view each ligand molecule’s model within the generation
- add additional columns, to show grid scoring and molecule properties (Column > Show)
- save images, mol2, or pdb files (File > Save Image, PDB, Mol2), as needed
